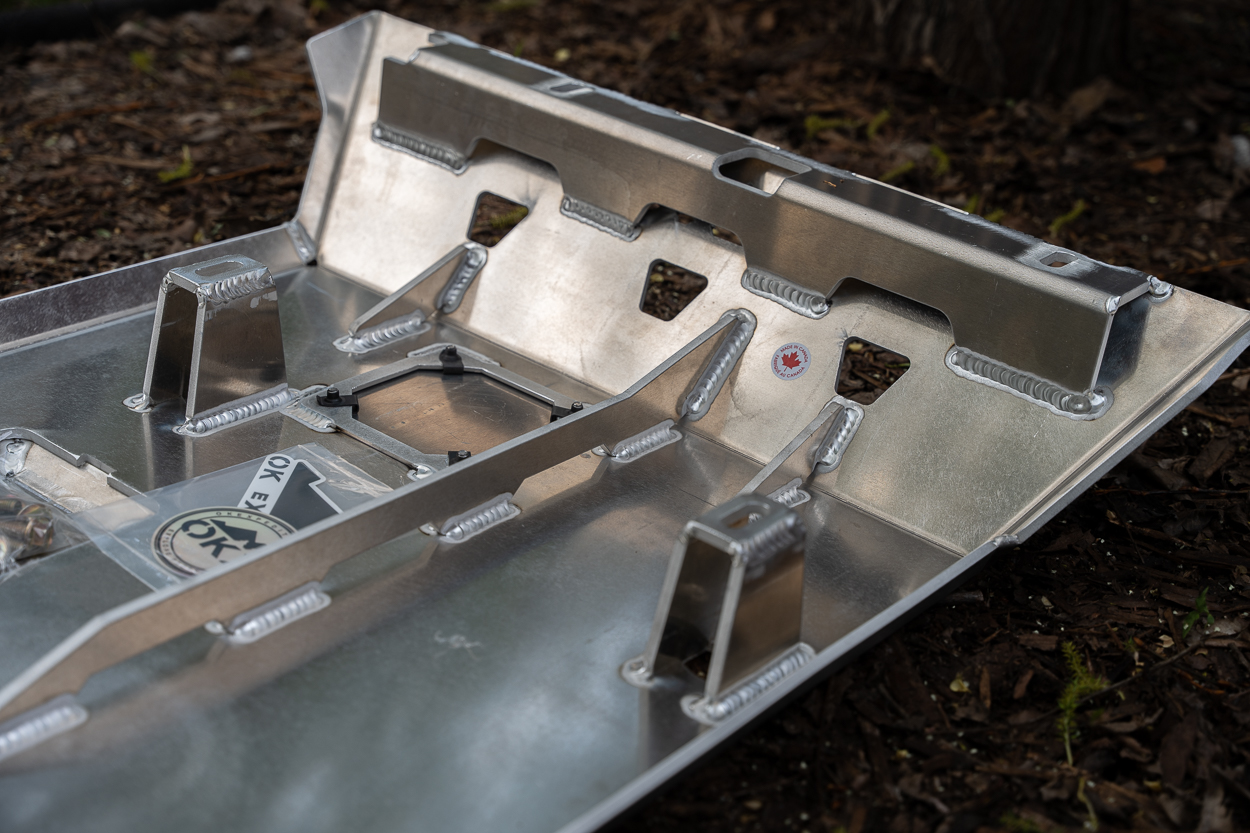
Investing in a set of high-quality skid plates is undeniably one of the most important measures you can take to safeguard your 4Runner off-road. Whether you’re an occasional weekend camper or an avid rock crawler, the most vulnerable parts of your truck are at risk, even with the thin factory skid plates.
Considering the cost of these vital components, a set of high-quality skids is a no-brainer. With them, you can navigate with confidence, knowing that your 4Runner’s undercarriage is shielded from potential impacts, smashes, or snags. The OK Expedition skid plate package is perfect for this!
Find It Online:
- Engine Skid (2010+ 4Runner): Check Price
- Transmission Skid (2010+ 4Runner): Check Price
- Transfer Case Skid (’03-’23 4Runner): Check Price
Table Of Contents
Why Skid Plates Are Important

Skid plates are important for off-roading because they protect the underside of a vehicle. Particularly, the vulnerable components such as the engine, transmission, and transfer case. Here are a few reasons why they are crucial in off-road environments:
- Protection from impacts: Rocks, tree stumps, or other obstacles can cause damage to critical components. Skid plates act as a shield, absorbing the impact and distributing the force across a larger surface area, minimizing, or preventing damage.
- Preventing terrain interference: They help reduce the chances of getting stuck or high-centered by providing a smooth surface that allows the vehicle to slide over obstacles.
- Shielding against debris: They protect against road or trail debris damaging essential components.
- Maintaining vehicle integrity: Off-roading puts additional stress on a vehicle’s undercarriage due to the constant vibration, flexing, and torsion. Skid plates reinforce the structural integrity of the vehicle by adding rigidity.
- Peace of mind: Allows you to focus on maneuvering through obstacles rather than worrying about your undercarriage.
Skid plates are typically made from durable materials like steel, aluminum, or composite materials. They are designed to withstand the rigors of off-road use. However, the material and coverage required will vary depending on your needs.
What You Should Look For In A Skid Plate

There are several factors to consider to ensure you choose the right ones for your off-roading needs. Here are some key things to look for:
- Compatibility: Verify that they are specifically designed to fit your vehicle’s make and model.
- Material & Construction: Skid plates are typically made from materials like steel or aluminum. Steel offers excellent strength and durability, but it can be heavier. Aluminum is lightweight and provides good protection but may not be as rugged as steel.
- Coverage: They should adequately protect critical components like the engine, transmission, transfer case, fuel tank, and differentials.
- Ease of Installation: They should be easy to install and removable when necessary, preferably without the need for extensive modifications or drilling. Most popular options are bolt-on.
- Quality & Durability: Look for skids from reputable manufacturers. Read reviews and seek recommendations from fellow off-roaders to ensure they are capable of withstanding the demands of off-roading.
- Weight and Ground Clearance: Skids add weight to your vehicle, which can affect performance and fuel efficiency. Additionally, ensure that they do not significantly reduce your vehicle’s ground clearance.
- Price: While cost shouldn’t be the sole determining factor, it’s essential to find a balance between quality, features, and affordability. Aluminum skids, for example, cost more than their steel counterparts.
Who Is OK Expedition?

I always wanted aluminum skids for my rig. I did not want to add too much weight, as weight is the enemy! For the type of wheeling I do, they make perfect sense and ¼” thick aluminum is plenty strong. Another factor was the positive feedback that I got on OK Expedition from local guys up here in Canada who wheel hard.
Dave (the owner) started this business from his home in 2018 with the invaluable support of his wife, Kaila. Having been an active member of the 4WD community for many years, particularly in the rock-crawling world, he couldn’t help but notice the scarcity of high-quality off-road products made in Canada for the average backcountry enthusiast.
What initially began as a side hustle to feed his fabrication addiction has now evolved into a full-time pursuit of his passion. With over 20 years of experience in custom automotive work spanning fabrication to paint and bodywork, Dave always nurtured a deep desire for modifying vehicles. He is incredibly grateful that he can now engage in what he loves every single day.
Looking ahead to the future, the team is thrilled about its expansion plans. They will be moving into a new space that will provide them with more room to grow and flourish. The OK Expedition team has an extensive list of new products waiting to be brought to life, and they are also planning to introduce new vehicle platforms into their lineup.
Installation

Installing the OK Expedition skid plate set is simple and only requires a few tools. A second set of hands is optional but does help with holding the skids in place as you install them.
Required Tools
- Sockets – 12mm, 13mm, 14mm
- 3/8″ & 1/2″ Ratchets
- Ratchet Extensions
- Torque Wrench
- Impact Gun (Optional)
- Floor Jack (Optional)
Step 1. Remove OEM Skids

Remove the front engine skid, front skid support brackets, and transmission skid. The front engine skid is held in place using four 14mm bolts; and will swing down from the back once the bolts are removed.

Next, remove the four 14mm bolts for the front support brackets. Lastly, remove the four 14mm bolts holding the transmission skid in place.
Step 2. Install New Engine Skid

With the help of a friend or a floor jack, mount the new skid in place and loosely screw in the bolts. There are six bolts in total (M10x30mm bolts in front, M10x35mm in the middle, M8x40mm bolts, and washers at the rear). Use the 14mm socket for the front two bolts and 13mm for the other four.

For the rear bolts, be sure to use the provided aluminum spacer (3/8″ thick). Keep everything loosely installed.
Step 3. Install Transmission Skid

Loosen the support brackets for the factory transmission skid and position the new transmission skid. Lift the round aluminum spacers carefully and slide the transmission skid above the engine skid.

The order of things should be:
- Aluminum spacer on top
- Transmission skid in the middle
- Engine skid at the bottom
Keep the rear supported with a floor jack for now as the transfer case skid will be mounted on the same bolts.
Step 4. Remove Factory Transfer Case Skid

The factory transfer case skid is held on with four bolts 14mm (two in front and two in back. Remove all four of these.
Step 5. Prepare & Mount New Cross Member

Remove the factory 13mm bolt holding onto the brake line. Use the provided slotted rectangular spacers for the bottom holes with factory transmission factory support links. Insert the spacers in the factory support feet and align them with the skid plate holes.

Insert M10x30mm bolts and tighten them loosely.

Fasten the provided M8x30mm bolt through the brake line bracket into the new cross member.

On the passenger side, it just lines up with a factory hole. Use the provided M8x30mm for the side holes. Note the orientation of the cross member and make sure it is pushed all the way toward the front of the vehicle before tightening the bolts.
The torque spec for M8 bolts is 28 ft/lbs. and 42 ft/lbs. for the M10 bolts.
Step 6. Mount Transfer Case Skid

With the new cross member in place, insert the provided rectangular slotted spacer (from transfer skid hardware) in the feet of factory transmission skid brackets. Carefully insert the transfer case skid in between the spacer and the transmission skid and loosely install the M8x50mm bolts.

Repeat the process on the other side. The order of things should be:
- Spacers on top
- Transfer case skid
- Transmission skid on the bottom

From underneath the new cross member, install the provided 3/8″ x 1-1/4″ carriage bolts up through the skid plate. Secure them with large flat washers and Nyloc nuts.
Step 7. Check For Exhaust Clearance

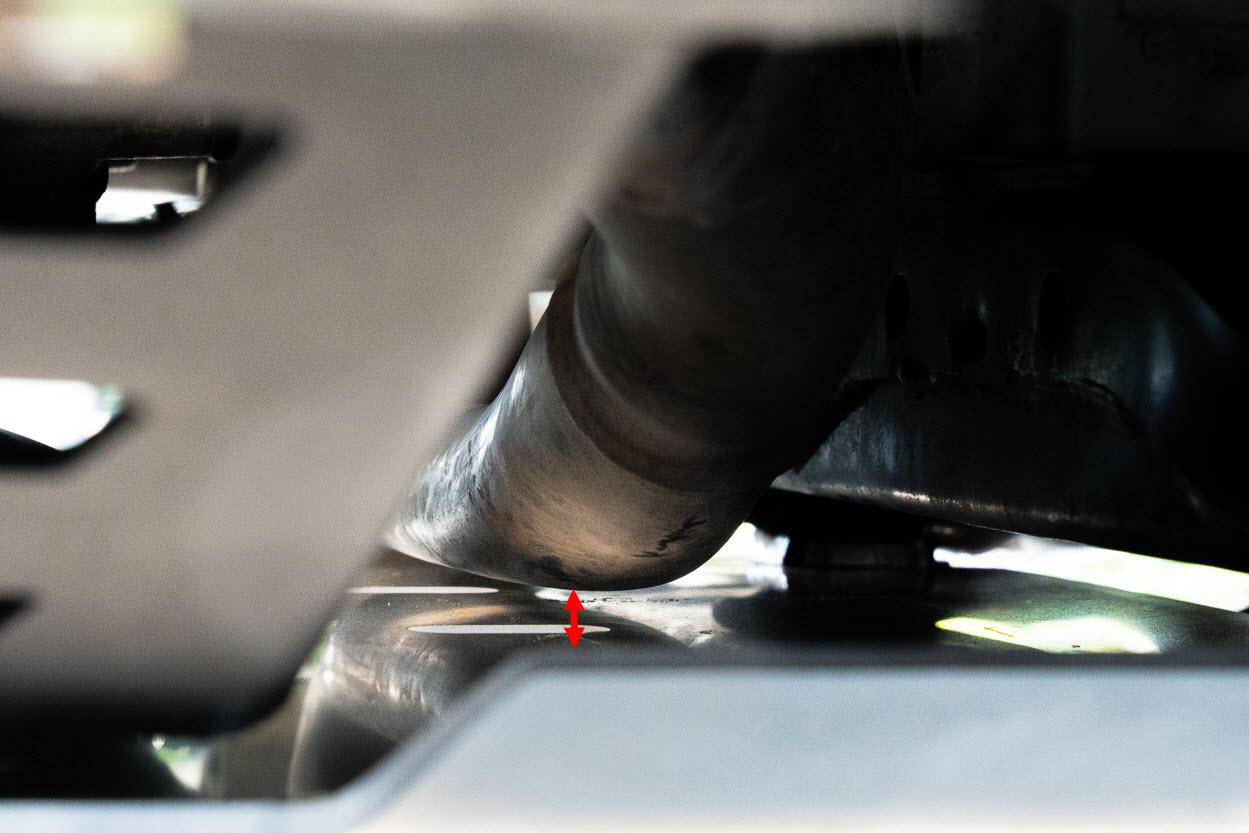
With everything in place, check for the clearance between the exhaust cross pipe and the transfer case skid. If you have 3/16” of gap or more, you’re good! If not, install the thicker rectangular slotted spacers (part of the transfer case skid hardware) instead and check for clearance again.
Should the exhaust pipe still make contact, OK Expedition recommends replacing the two rubber exhaust hangers as they can stretch over time and allow the pipe to sag down lower than normal. Another option is to use a band/hose clamp around the driver-side rubber hanger to remove some sag and lift the exhaust pipe slightly.
With everything in place, tighten everything down and you’re ready to hit the trails with confidence.
Final Thoughts

After installing the OK Expedition skid plate package, I am extremely satisfied. They were relatively easy to set up, and the instructions provided were clear and concise. This allowed me to complete the installation without any major issues or complications.
One of the most notable aspects of this set is its impeccable fit. The plates align perfectly with the undercarriage of my 4Runner and provide comprehensive coverage and protection to critical components. It also adds an aesthetic appeal, as they seamlessly blend in with the undercarriage.
Furthermore, the finish is top-notch. Even after subjecting them to rigorous testing on the trails, they showed no signs of significant damage or wear. This reassures me that they will withstand the toughest off-road conditions.
Overall, I am thoroughly impressed with the OK Expedition skid plate package. The ease of installation, perfect fit, and exceptional finish are all there. Most importantly, they excel in their primary purpose, providing reliable and robust protection. I can now enjoy my adventures with the peace of mind that my vehicle’s undercarriage is protected.

the factory kdss front plate follows the coutours pretty closely, leaving room for the swaybar.
Would you say the okx front plate is a lot lower than the factory plate in the very front ?
I have been wheeling these for quite some time now and haven’t had any issues. The factory one can’t take any hits at all and bends pretty easily. These have been mint after a few hits!
I really like the design of this skid plate package. However, I prefer engine skids that integrate with the OEM front support brackets and don’t require removing them.
These are gusseted as you can see in the above pictures so I’m not worried about the support brackets at all! But to each their own and I appreciate the feedback.