Sway Bar Bushing Replacement – The Source Of Squeaking That No Shop Could Find
Tracking down noises in your 4Runner can be a process. From professionals to complete newbies, finding and fixing noises can be an endless task, racking up money and time. I try to be on team DIY as often as I can since I like to address every little squeak ASAP.
As my 2015 SR5 reaches its 135,000-mile service, new noises are always popping up whether that be the bearings, bushings, or joints all wearing out due to long highway miles and driving on trails in a way that often makes my passengers uncomfortable.
I’m still tracking many noises down, even as I write this article. However, I felt that the simple task of replacing my sway bar bushings was one that warranted a quick write-up. I’ve taken my 4Runner to several shops, local and while on the road, to diagnose noises, and not once did I get a suggestion about checking my sway bar bushings.
This is an inexpensive maintenance task that only requires about 10 minutes of your time and a wrench. It’s an easy place to check while tracking down noises that would have saved me a lot of money in the pursuit of quietness.
Find It Online:
- Suspension Stabilizer Bar Bushing (Front) – P/N 48815-35130: Check Price
- Aftermarket Sway Bar Bushings: Check Price
Sway Bar Bushings
What Noise Does Sway Bar Bushings Make?

I hate trying to diagnose and describe noises to my mechanic. It often isn’t helpful as everyone has different ideas and experiences. Unless you can replicate the exact noise for your mechanic, it may send them down the wrong path to finding a fix.
So, to keep it brief, the noise that I heard (that this replacement ultimately fixed) was during low-speed changes of direction like pulling in and out of a parking spot (but not when at a standstill turning the wheel). It sounded like a clicking (but not a ting) when making tight turns. This was the only time I’ve heard and could replicate the noise, however it may have been happening at high speeds when the noise was drowned out by road noise.
Based on what I’ve read online, this can be many things, like your LCA cam bolts being loose, control arm bushings being worn out, and so on. These are all expensive things to fix, tough to fully confirm (as a beginner), and a lot of tools are needed. Fortunately (unfortunately?), most of these items have been replaced or upgraded recently, so they were unlikely culprits.
Installation Overview

Installing new bushings is a straightforward task. You unbolt the bracket, wiggle off the bushing, wiggle on the new one, and bolt it back together.
Note: This should be the same for all 5th gen 4Runners without KDSS. Toyota breaks down their front stabilizer, aka, sway bar system, in two ways: with and without KDSS for our model years. There are bushings on the KDSS version as well, however, I can’t speak to how that system works and whether the noise I heard and fixed would carry over.
There are a lot of options available for replacements in terms of brands and materials. After researching for a bit, I felt that OEM was the way to go for my moderate driving style. Poly replacements seemed like an interesting change, with many people saying they felt increased handling on the road. However, I read about a few people who ended up cracking those bushings when offroading and really flexing the sway bar.
The price varied between the dealerships local to me, check around for the best deal. Shipping can be steep, so I picked up bushings from the parts center once they arrived at the dealership.
Tools & Supplies
- 14-mm socket
- Thick gloves (I’ll explain more about this later)
Accessing & Removing The Brackets

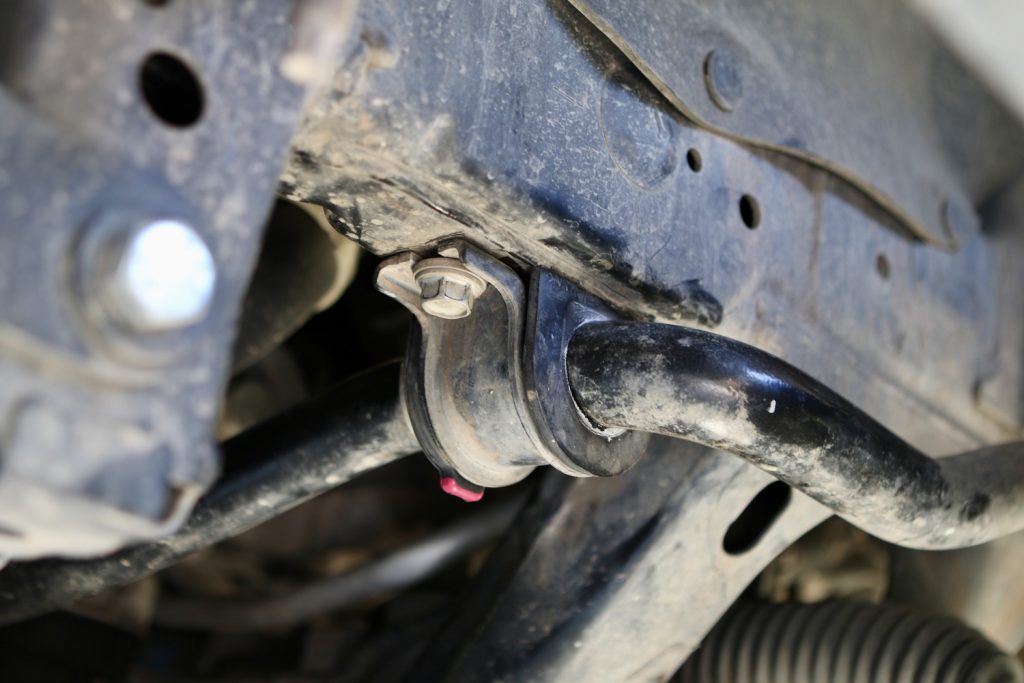
The brackets are in a very accessible spot. I have an RCI engine skid plate and there was nothing to remove in order to get to these brackets. On the brackets, the forward bolt hole is open-ended and the back is closed. This means there isn’t a concern about losing the alignment of the sway bar when taking the bracket off.
You don’t have to remove both brackets at once. I did one at a time to keep the sway bar in place. There was still enough movement to get the bushings in and out. I would recommend loosening up the other side to further increase the bar’s ability to move.
Bushing Arrangement & Installation

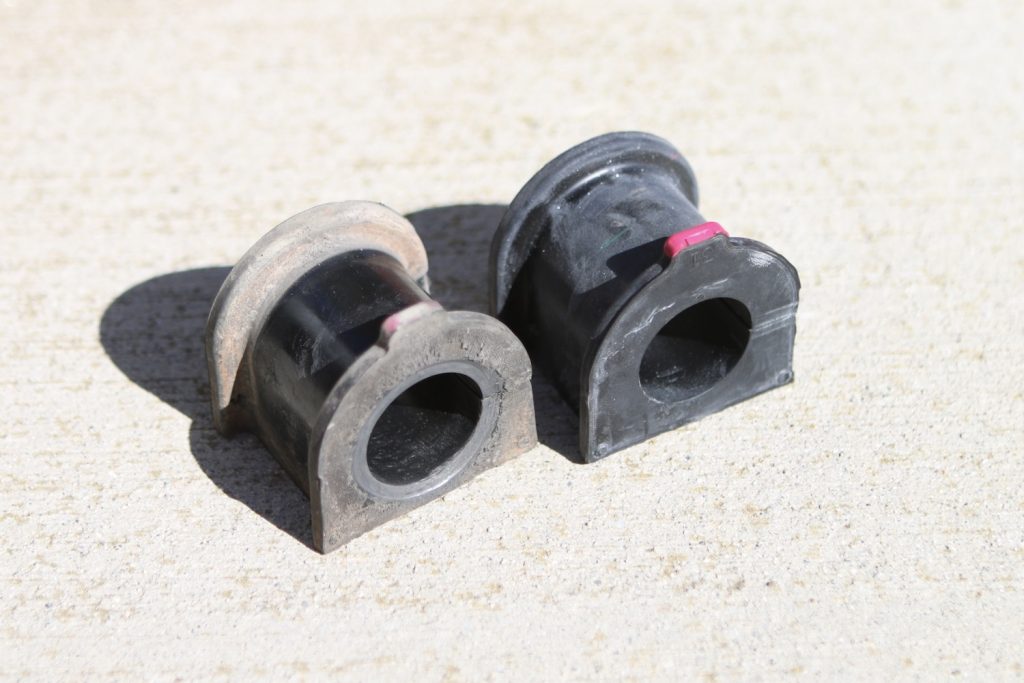
The bushing rests against a “bushing stopper,” which is the silver-colored ring on the sway bar. It takes the guesswork out of where the bushing needs to rest when bolting everything back together. If you’re buying OEM, one side of the bushing has a red/pink tab. Make sure that side is facing the inside of the bar, closest to the bushing stopper.
I recommend using padded gloves if you’re clumsy for this next step.
Sliding the bushing back onto the sway bar can be awkward. There are a lot of weird angles and moments where it won’t budge and others when it moves easily. My hand slipped off the bushing while struggling to get it back into its intended location and I unintentionally found out that I could not karate chop the frame in half. I’m not entirely sure if the padded gloves would have helped, but I’d probably have fewer cuts on my hand now.
Final Thoughts

Swapping out your sway bar bushings is a simple and easy DIY replacement that can be done in a couple of minutes. It’s probably one of the least expensive things you can replace in your suspension system in terms of parts, tools, and labor.
In my dream of eliminating all noises from my 4Runner, many shops that I’ve visited have recommended many expensive fixes without suggesting easy and inexpensive options for me to check. I know your mileage will vary, however, for those who are trying to find quick and easy things to check off your list before heading to a shop, this article will hopefully find you at the right time.

Changed my front ones, but now I see a gap between the bar and the bushings. Got OEM from Toyota dealership.
Is it possible that there are two sizes?
Seems like you may have been shipped the wrong pair, so fit perfectly. If you haven’t already, I would go back to the parts center and see what you ordered vs what you got.
Spot on. I just swapped mine at 160k. Thought I might need new struts. This easy fix with the links as well was the best repair I have made on my car for the time and money hands down.
what size is the sway bar bushing you used on your 2015 runner I have a 2016
Hi Austin, this fits all 5th gen models without KDSS.
Is there a Rear sway bar also on the 2005 4runner like there is on the front? Ive seen bushing for the rear but I thought they only had lateral arms, uppers and lowers. And if so where is it located?
Thanks
Anybody got the part number for the 4 bolts that hold the bracket to the frame, cant find anywhere online. non kdss to be specific, thanks.
Do you have an article on replacing the bushings on the KDSS system sway bar? I’ve replaced mine already once due to some “excessive” articulation that literally popped the end bushing off the driver’s side. Since my last trip in heavy mud/snow, an oh-so-ever annoying squeak has begun and we’ve isolated it to the passenger side bushing. 2 days ago, I took both end bushings out, did a thorough cleaning with soap and water and replaced them. Once they dried all back up, the squeak returned again. Thinking of doing the Siberian bushing swap; thoughts?
Mark, check out drkdss.com. He makes brackets that fix the bad angle of the SB bushings on the lower control arms. If you have a lift you definitely need them.
Hi Mark,
I do not, as my 4Runner is without KDSS. I would think it’s not much different. The connection points to the KDSS system is a similar loop and bolt connection. However, I know it’s a different part number as the bushings are a different shape/size.
As far as rubber vs. poly bushings, they are much more rigid, and as far as I know require require greasing as a part of that. I did consider that swap, however, after running through all the forums, I found people were cracking/destroying their poly bushings when offroading to the articulation of the system applying a ton of pressure on the bushings.
If you don’t offroad, the praise of better on road handling seems like a real bonus.
I feel the same way about searching for noises. In my past I thought my bushings were making noise as well. Since then I made it part of my 5000 mile routine to use a silicone based spray lubricant to maintain the health of the rubber, and add some lubrication. I found it to be very effective. Great article, I will be referencing when the time comes to replace the bushings.
Thank you!
That’s a great recommendation. I too carry a bottle of silicone spray in the car to quiet noises while on trips. Just add it to the list of things to hit every so often.