
You have a roof rack and maybe even a rooftop tent (RTT), but you don’t have a way to climb up top.
So, what do you do?
You could get a ladder out; however, a ladder is bulky and you probably don’t want to haul around a traditional ladder with you on your adventures.
What you want is the C4 Fabrication Summit Ladder!
While there are a few different manufacturers of rear hatch ladders for the 5th Gen 4Runner, I believe the C4 Summit Ladder gives you the highest quality design with the most versatility.
Find It Online:
- C4 Summit Hatch Ladder (Version 2 – Updated): Check Price
- Aftermarket Liftgate Struts: Check Price
The C4 Summit Ladder
The Summit Ladder is a 100% bolt-on, no drilling option for 5th Gen 4Runner owners.
While the ladder does contain some steel components, the main construction of the ladder is aluminum. This steel and aluminum construction helps to provide a 250lb load rating.
The fine details of this ladder weren’t disregarded either, as the ladder has stainless steel mounting hardware and slotted side supports so you can attach accessories such as side steps, a Rotopax bracket, and many other options.
How easy is it to install this ladder?
Well, let’s find out as I go through the step by step process of building and installing the C4 Summit Ladder.
C4 Summit Ladder Step-By-Step Install: The Building Process
- Lay Out All Parts To Assemble
- Apply Anti-Seize Lubricant on Bolt Stud & Assemble Top
- Assemble Ladder Steps
- With a Friend, Put Together Main Assembly
- Install Other 2 Steps
- Clean Top Support Mount & Secure On Bracket
- Assemble Bottom Bracket Using Double-Sided Foam
- Place Aluminum Blank In Lower Mounting Bracket
C4 Summit Ladder Step-By-Step Install: The Mounting Process
The Building Process
The Summit Ladder comes unassembled, so you will need to spend a little time upfront putting the ladder together prior to the actual “install”.
The building process will probably take you 30 – 60 minutes depending on your skills.
Overall, this ladder is quite easy to put together.
If you have ever built some Legos or an erector set you will be right at home. Let’s go ahead and run through the step by process of how I built the C4 Summit Ladder.
Step 1. Lay Out All Parts To Assemble

First, you’ll want to lay out all the different pieces that are needed to build the ladder.
I tried to lay them out in the way that they would be assembled just so I could have a good grasp of what pieces go whereas I bolted them together.
Step 2. Apply Anti-Seize Lubricant on Bolt Stud

Now you are ready to start the assembly process.
I recommend starting with the top of the ladder first. There are 2 main bolts and nuts that hold the top assembly in place.
Before assembling the nut and bolt, make sure to apply some anti-seize lubricant on the stud of the bolt.

This will help give you an opportunity to loosen the stainless steel hardware should you ever need to in the future. You will need to apply anti-seize to all bolts for this install.
C4 doesn’t give torque settings, so I recommend snugging everything up pretty snug; however, you will want to snug all the nuts and bolts up till the very end once everything is assembled.
This will allow you to make slight adjustments if needed.
Step 3. Assemble Ladder Steps

Next, I recommend assembling the steps for the ladder itself. This is extremely easy to do, but you need to do it a certain way.
There are 4 steps and 4 “traction pads” for the steps.
You might think that you should try to slide the grips into each of the steps….wrong.
The best way to assemble the step and traction pad is to simply align the traction pad on top of the groove that each step has and then press it down into the step.

If you try to slide the traction pad in, you’ll have too much friction and it will be extremely difficult—just press them in from the top and it will pop right into place.
Step 4. With a Friend, Put Together Main Assembly

Now you need to get the main assembly for the ladder put together.
To do this, you will need 2 steps and the 2 outer main supports.
It might be helpful to have someone else to help you get everything aligned and held in place until you can bolt it together.
Essentially, you want to get the structure to look like the photos above.
Something to keep in mind when you are trying to assemble this structure is that the long support arms go inside of the upper assembly structure. There are little bent-in sections at the end of each long support arm that should point inwards (this is where the lower bracket mounts to).
In order to secure the structure, you have to have the top step in place, as the bolt that holds everything together utilizes the threads in the step to tighten down.
Pro Tip: It’s best to go ahead and assemble the shorter vertical support arms after getting the upper and lower step in place. Do not assemble the lower bracket to the structure yet. This will be done at a different time.
Step 5. Install Other 2 Steps On Ladder &

You now need to install the other 2 steps on the ladder.
Once again, make sure you apply anti-seize lubricant to all bolts during the install process.
Tighten All Bolts To Fit Snug
After installing these last 2 steps, then the main ladder structure will need to be assembled.
Go ahead and tighten all of the bolts fit snug so you are ready to mount the ladder to your 4Runner.
Step 6. Clean Top Support Mount & Secure On Bracket
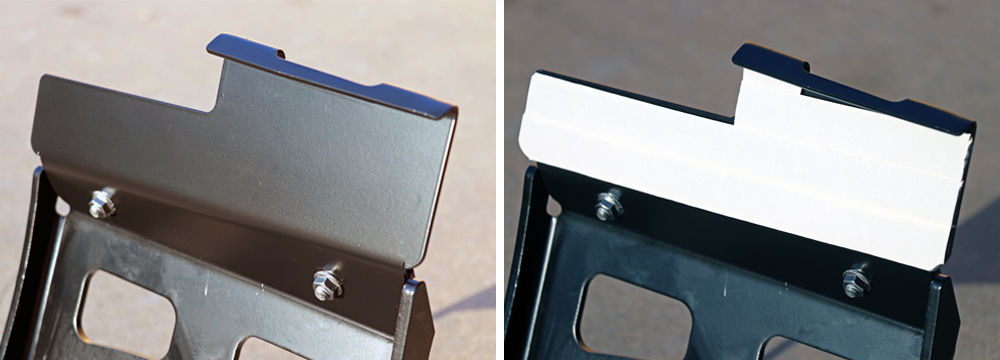
Clean the bottom of the top support mount with some alcohol.
After doing so, use the double-sided foam and place it uniformly on the bottom of the top mounting bracket. Try to position the foam so there are no cracks.
Step 7. Assemble Bottom Bracket Using Double-Sided Foam

Assemble the bottom bracket by using the foam (the foam that is sticky on one side…not both) and place it in the trough of the lower bracket that is opposite of the holes for studs to go through.
Try to place this foam as neatly as possible.
You will also need to place the foam on one side of the aluminum blank that is provided with the ladder. I had to cut my foam to fit the aluminum blank. A good pair of scissors or a razor blade should work fine.
Step 8. Place Aluminum Blank In Lower Mounting Bracket

Place the aluminum blank in the lower mounting bracket trough with the foam facing the other foam.
Now, slide in the 3 studs to gently hold the aluminum in place.
The Mounting Process
Now you have the ladder assembled and you’re ready to mount it to your 4Runner.
Step 9. Measure 3″ From Left Side of 4Runner’s Roof

Measure 3 inches from the left side of your 4Runners roof.
The best way to do this is by placing a tape measure in the “seam” on the roof of the 4Runner right where the roof and rear hatch meet.
You can simply use painters tape to mark your 3-inch mark.
Note: The right side of the tape should mark 3 inches, not the left side. The reason is that the top mounting bracket will go to the right of the three-inch mark so you don’t want any tape beneath it.
Step 10. Measure 9.5″ From Bottom Left of 4Runner’s Liftgate

Measure 9.5 inches at the bottom left side of your 4Runner’s liftgate.
C4 recommends 10.5 inches, but I can tell you that this measurement seems to be off quite a bit.
I highly recommend marking 9.5 inches instead of 10.5 (you won’t be able to get proper alignment with the 10.5-inch mark).
Step 11. Mount Bottom Bracket Aligning to 9.5″ Mark

After marking 9.5 inches from the bottom left of the liftgate, go ahead and mount your bottom bracket.
Do this by sliding the trough of the bracket into place with the left side of the bracket aligning right on the 9.5-inch measurement you marked.
You will want to tighten the 3 studs down to hold the bottom bracket in place but don’t over-tighten as you might have to do some minor adjustments prior to finishing this install.
Clean Top of Hatch w/ Alcohol & Cloth
Clean the top of the hatch where the upper bracket with double-sided adhesive foam will go.
I used alcohol and a lint-free cloth to do this.
Step 12. Remove Foam Backing + Secure Ladder Off of 3″ Mark

Remove the backing on the double-sided foam and position the ladder off of the 3-inch mark on the top of the hatch.
You will want to be very cautious here (and might want some help), as the foam is extremely sticky.
Note: Take your time and be understanding that once you place the foam on the roof, it isn’t going to move… so get your alignment right!
You will also want to shove some cardboard between the crack behind the upper mounting bracket so that the bracket is tight and snug to the rear hatch.
Rotate Ladder Down To Adhere To Top of Rear Hatch
Slowly start to rotate the ladder down (while pulling towards you to ensure it is properly seated against the rear hatch) to get the adhesive to touch the top of the rear hatch.
It is important to try and pull it towards you and align the ladder towards the lower mounting bracket as you go.
Secure Bottom of Ladder to Lower Bracket Support
Now you need to mate the bottom of the ladder to the lower bracket support.
This was one of the more difficult things to do, as it does require a little bit of strength and good grip. You will have to close the gap between the lower bracket and the bottom of the ladder by squeezing the space between them. You might also have to slide the lower bracket left or right just a bit.
It really helps to have someone squeeze the space between this gap and someone else put the bolts and nuts in place.
Reposition Lower Bracket, If Needed
If needed, now is the time to reposition the lower bracket. How do you know if you should reposition the lower bracket?
- You can’t get the ladder to align with the lower bracket
- Your ladder doesn’t look straight
- Your ladder isn’t level
If you do need to adjust the lower bracket, simply loosen the 3 studs on the lower bracket and slide it so that the ladder is level vertically.
After Alignment is Done, Tighten Bolts On Lower Mounting Bracket & Ladder
After you get everything aligned, you need to tighten all the bolts connecting the lower part of the ladder and the lower mounting bracket.
Something extremely important in my opinion is to rotate tightening the 4 bolts. Tighten one a little, then go to the bolt across and diagonal. Tighten it a little and then continue rotating around in a star pattern. If you tighten one bolt all the way, it puts the bracket in a bind. You need to rotate tightening and take your time doing so.
Step 13. Tighten & Secure Studs On Lower Mounting Bracket

Tighten the 3 studs that hold the lower mounting bracket in position. You don’t need to go extremely tight, just snug.
Lastly, Apply Pressure To Double-Sided Foam On Top of Hatch
To finish things off, you need to climb on top of the ladder and apply pressure for a bit to the area where the double-sided foam is to make sure it gets a good “stick” to the top of the rear hatch.
Note: I actually sat on the location of the upper mounting bracket where the double-sided sticky foam was.
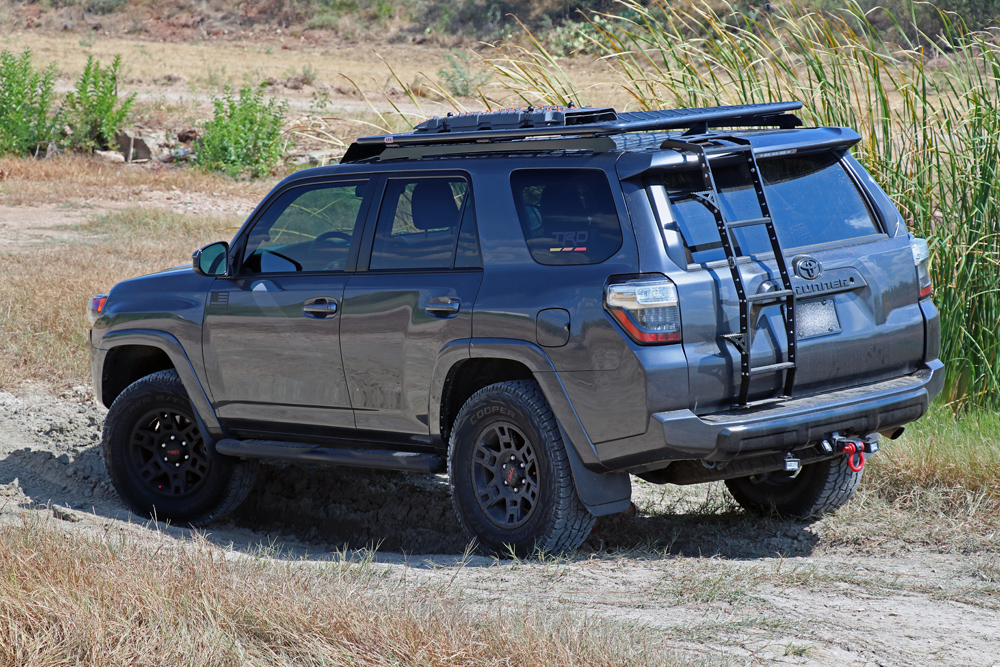
First Impressions

Overall, this ladder is pretty legit! It is lightweight, sleek, looks great, and adds some functionality for those of us who need to get on our 4Runner’s roof.
One thing a lot of people have asked is if this ladder works with my ARB Flat Alloy Roof Rack—the answer is yes, very good!
I didn’t have any clearance issues and I think the C4 Summit Ladder and my ARB Roof Rack pair nicely.
After reading through a few other threads online, it appears the C4 Summit Ladder is compatible with all major roof racks, if not all major roof racks including Gobi, Baja, Front Runner, Prinsu, Etc.
Climbing the Ladder

The steps are pretty easy to use and are spaced adequately.
One thing to be cautious of is kicking the back of your rear hatch when going up or down the ladder.
In my opinion, C4 has a good balance of spacing distance between the ladder and rear hatch while still maintaining a sleek design; however, if you aren’t careful you will kick the back of your rear hatch.
What really has impressed me with the C4 Summit Ladder is just how sturdy it is! I am about 200 lbs, and this ladder doesn’t flex at all when I am on it. It really has good construction and design.
The Summit Ladder Advantage

There is one significant advantage this ladder has over other ladders on the market, such as the Gobi ladder— versatility.
You might be wondering, “How can a ladder provide versatility?”
The answer is through aftermarket options.
You can add side steps, Rotopax mounts, gas cans, recovery boards, first aid kits, shovels, an ax, and many other items to this ladder. The construction of the ladder with multiple “holes” on the sides really gives you a lot of options for mounting things as well as where you want to mount them. This ladder is Rotopax ready right out of the box.
Other ladders on the market are simply tubular design.
Yes, you can find aftermarket mounting solutions for these ladders, but you will have much more versatility with the C4 ladder due to the construction of the multiple mounting holes on the side.
Another item to mention is the turnaround time for a C4 ladder.
Right now, C4 has about a 4-week turnaround time.
Gobi, for example, could take months. I’ve known some people that have literally waited 6 months to get their ladder.
How Does the Hatch Open?

While you can open the rear hatch with the ladder installed, it won’t open all the way.
It will stay all the way up if you help it reach the topmost point; however, it will not open all the way without some assistance.
For this reason, I suggest purchasing some aftermarket struts for the rear liftgate. They are relatively inexpensive, easy to install, and well worth the extra money.
If you will be mounting recovery boards, shovel, gas tank, or anything like this, you will most definitely need aftermarket struts.
Absolute Must-Have:
- Aftermarket Liftgate Struts: Check Today’s Price
Note: Be careful not to buy too powerful of struts though. If you have struts with too much force your liftgate will open too fast and it will be difficult to close.
Visibility
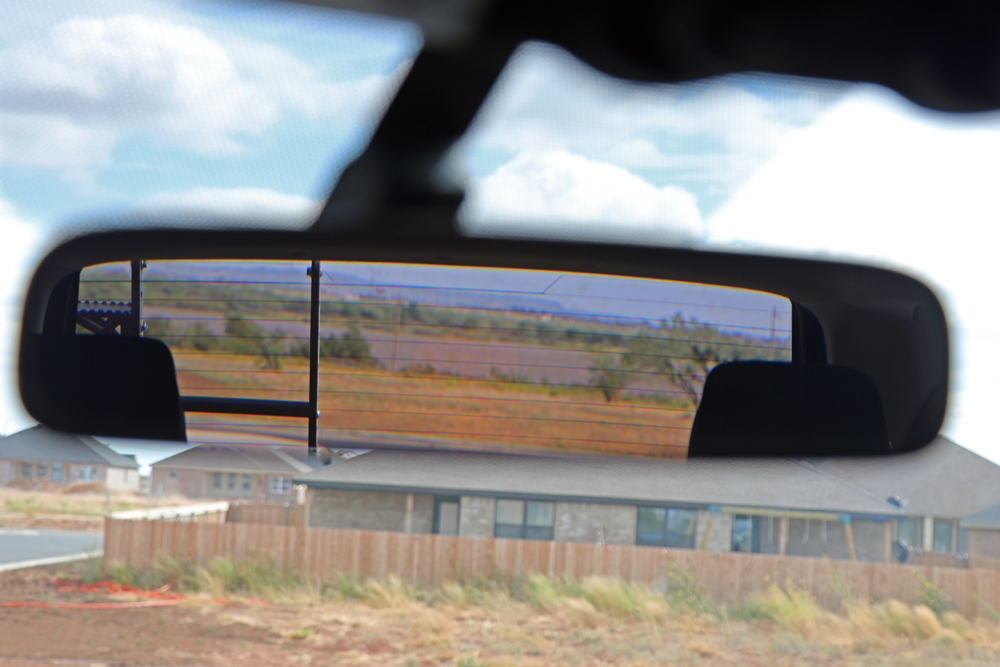
Perhaps I am the only person that didn’t realize this, but why is the ladder positioned on the left side of the liftgate?
The reason is that it impacts your rear visibility the least.
While I can see the ladder in my rearview mirror, it doesn’t restrict my view hardly at all. It is very easy to get used to and doesn’t bother me one bit.
The rearview camera does pick up some of the ladders in its “fish-eye” view, but once again. The view is not restricted that much and you still have a very good picture of what is behind you.
Final Thoughts

The C4 Summit Ladder is amazing!
In my opinion, it is the best ladder that money can buy for a 5th Gen 4Runner. The versatility of the multiple mounting points, high-quality materials, and sturdy design makes this ladder at excel at everything you could ever ask for in a ladder for your 4Runner.
The C4 Summit Ladder can do it all!
I’ve noticed that this ladder is no longer listed on the C4 Fab website and it’s sold out or listed at a ridiculous markup everywhere else. I’d love to purchase this ladder but not if it’s been discontinued. Any further info would be greatly appreciated.
Would it be possible to adapt this C4 Fabrication hatch ladder to a 3rd gen 4Runner?
I just had to add this: https://www.youtube.com/watch?v=RjSzI152X4k&t=2s
I read this post and it made me get the ladder. I love this ladder and made a video of it as well so this might help out others. There isnt much information out there and I dig it over the other ladders out there. Currently running a basket on my 4Runner but will be changing it out for the Gobi Ranger rack and I will not be running the Gobi Ladder (looks to boring IMO so I will be selling it as soon as I get it). I didn’t opt for the struts because I run x2 2Gal Rota Pax, 4 side steps now (3 was shown in the video), and my shovel. I’m so positive the struts will not hold up with all that weight so I’m not going to bother because I’m using a ratcheting bar from Home Depot and it works like magic.
How much space does the ladder need between the spoiler and the roof rack when the hatch is open?
Could you tell me what the distance from the hatch to the outside of the ladder is? Wondering if it would interfere with a swing out on a rear bumper.
I just installed mine and it sticks out 2.6″ from the 4 in the raised 4Runner lettering above the license plate.
How does the C4 ladder react to auto car wash?
I typically hand wash my car, but I can’t think of any reason the ladder would have issues with an automated car wash…you should be fine.
Every time I google a 4Runner accessory/part your site pops up! Thanks for the info and install instructions, and contribution to the 4Runner hobby! Best – Rick
This write-up with pictures was very well done! I appreciate you taking the time. After much research, I agree this ladder is the best bang for the buck. I love the module options and I added side steps that have already paid off. My install is a little un-level vertically, I think I would have been better off following C4 Fab video measurements at 9 1/4″ on the lower bracket, but other than that; awesome ladder!
I have a 20 TRD Pro. Will this ladder work with the roof rack?
Mike, to the best of my knowledge it should. You might want to directly contact C4 just to make sure though.
Has this C4 ladder (or mounting brackets) undergone any changes since the original batch that pre-ordered in late 2018? I saw a few posts online from early adopters indicating that there were issues with rubbing or paint damage.
Eric, I have a 2019 and the original bracket did cause quite a bit of rubbing on the inside of the hatch, taking the paint off down to bare metal. This was after following all of the instructions and reviewing the YouTube video. I contacted C4 and after some great support they explained that there is a new bracket made with thinner material that resolves the clearance issue.
Be aware that when you’re installing it is critical to get the bracket hooked square against the edge of the hatch. Spacing is tight but with some patience it will clear and the ladder looks great.
Eric, I am not sure what changes have been made to the ladder since 2018, but I can say I have zero issues with rubbing or paint damage. Fit of the ladder on the hatch is excellent.
Should go without saying but remember to change-out the hardware fasteners for stainless steel. Stainless is forever. Anything I do I replace all fasteners with it.
The hardware on this ladder comes as stainless steel from C4, so no need to upgrade!
Can this ladder work with LFD crossbar roof rack too? Haven’t seen it mention on here and know that LFD has an awesome roof rack almost can compare it to the Prinsu. Thanks!
Shioban, I can’t give you a definite answer on that. It looks like it should work, but I’m not sure. If you give me a measurement of how far the rack goes to the back of the car I can try to verify for you. Thanks.
the link to the strut upgrades say these wont fit my 19 can you help or suggest ones that will?
Matthew, I believe it does fit a 2019. I contacted Lift Supports Depot and they said they’ve had several customers utilize these struts on 19 year models. I can’t guarantee it will work of course, but I did find verification from the manufacturer that it should work. I hope this helps.
What do you mean by “kicking the rear hatch”? Will the bottom (because it’s no bolt on) come undone under weight? Thanks in advance
Hey Nate, all that is meant by “kicking the rear hatch” is that the distance between the steps on the ladder and the rear hatch is only a couple of inches. If you are not careful, when you are putting your foot on the step you will kick the rear hatch with the end of your shoe. I will say that the distance between the steps on the ladder and the rear hatch is slightly greater on this C4 ladder than a Gobi ladder. In my opinion, this is good, because I struggled to climb up a Gobi ladder without kicking the rear hatch (there just wasn’t much clearance). The ladder is strong and secure, so there is no worry about the ladder falling apart or anything. I hope this helps you out!