
HOW TO INSTALL THE T8 ANDROID HEAD UNIT INTO A SR5P – 5TH GEN 4RUNNER
This is a step-by-step process to install the new T8 Android head unit into a 2018 SR5 Premium. The head unit boasts a beautiful 9” display and was developed by CarTrimHome, the Chinese manufacturer who also introduced the TRD Pro Replica grills to the 4R community.
When I came across the unit, I knew I had to have it.
I, like many others, have had constant issues with the OEM Entune system, from constant freezing or delays to outright crashing multiple times a week.
Here is what I’ve found Since Owning:
PROs:
- Less than $500 with the current promotion
- T8 Head Unit: Check Price
- Upgraded T9 Head Unit: Check Price
- 100% plug-and-play solution
- Apple CarPlay compatible
- No need to cut or trim any part of the dash
- 2 year warranty
- No more Entune!
CONs:
- 2 GB of RAM (4 would have been ideal)
- Apple CarPlay is not wireless (requires the dongle, also sold by the manufacturer)
- Not a well-known company (like Kenwood, Alpine, etc.)
- No XM capabilities
- Screen glare (can purchase a generic 9” anti-glare film from Amazon)
PARTS USED:
- T8 Head Unit: Check Price
- Car trim removal pieces (included with head unit kit)
- Harnesses (included with head unit kit)
- 10 MM Socket
- Screwdriver
STEP 1: REMOVE THE TRIM PIECES SURROUNDING THE OEM UNIT

Removing the trim pieces is straight forward. The majority of the center console removal is a series of clips that must be unsnapped. We’ll start with the left and right trim pieces towards the bottom of the console.
Each side is held in by 5 clips. Grip the trim piece along the top and bottom with your hands and pull straight towards you to remove.
Next, insert your plastic trim removal tool below the lower lip of the A/C control unit then use a twist motion to unhook the bottom clips holding it in. Pull the unit towards you and upwards to release the top clips located on each side.

Once the clips are removed, unhook the single connection (green circle below) using the ‘pinch-and-pull’ method.
Using your 10 MM socket, remove the 4 bolts. After this step, you should be able to gently pull the OEM unit towards you.

DO NOT PULL IT OUT FORCEFULLY – there are a number of connections on the back.
STEP 2: UNHOOK CONNECTIONS FROM THE BACK OF THE OEM UNIT
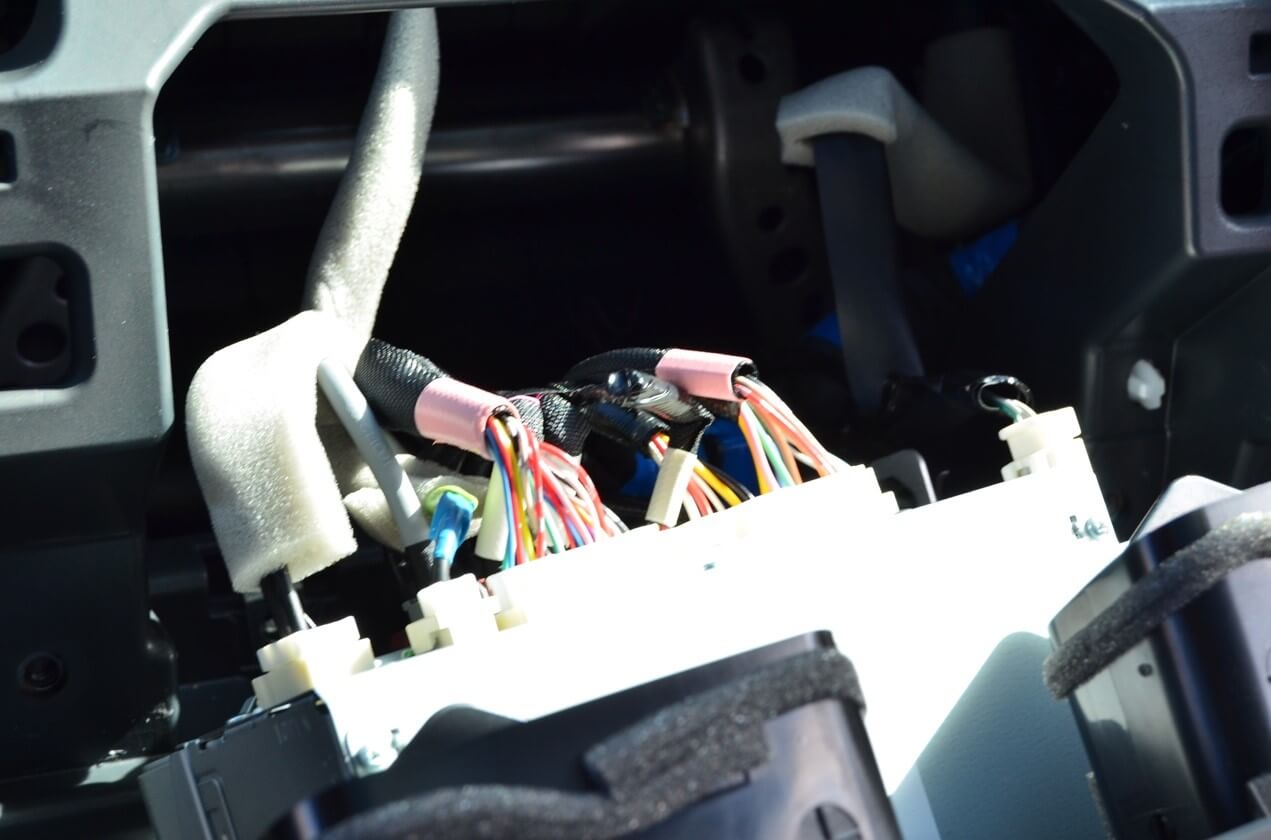
Remove all connections from the back of the OEM unit using the ‘pinch-and-pull’ method. You don’t need to worry about what goes where since the new Android unit is plug-and-play and no two connections are the same size.

Bye bye, Entune!
STEP 3: TRANSFER OVER A/C VENTS AND HAZARD LIGHT SWITCH

We’ll need to move over the two A/C vents and the hazard light switch from the OEM unit to the new Android unit. The A/C vents are held in by 4 clips – one on each side. I found it easiest to insert a small flathead screwdriver behind each clip, working my way in a clockwise pattern until each clip was unhooked, and then pulling the vent straight up. Repeat the same process on the other side. The vents will snap right into the new unit and lock into place.
To remove the hazard light switch, you’ll need to remove the screw located on the OEM bracket. Then, wiggle the switch out through the front of the OEM unit and into the Android unit.
STEP 4: PLUG IN CONNECTIONS TO THE BACK OF THE ANDROID UNIT
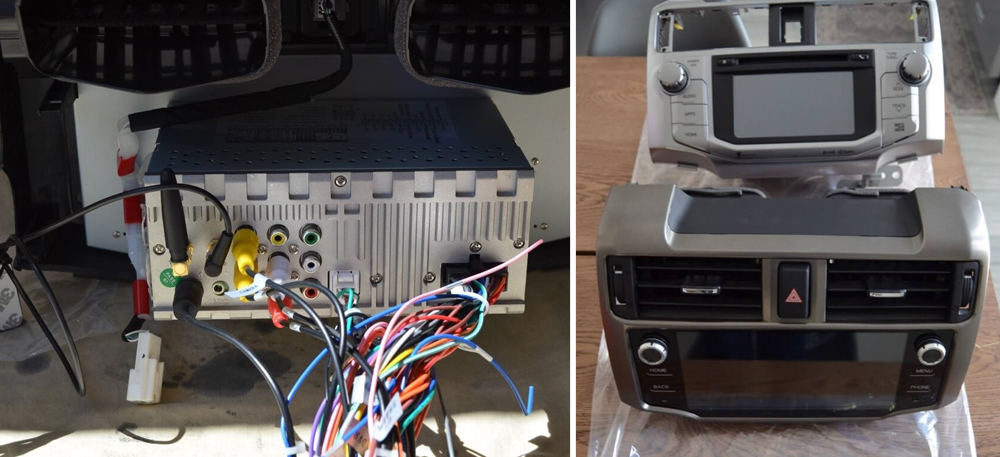
Believe it or not, the hardest part is done. Using the visual diagram on the top of the new Android unit for reference, we’ll plug in a few connections:
- Connect the GPS cable to the bottom left of the unit
- Connect the WiFi dongle to the top left of the unit
- Connect the two ‘Camera’ cables to the first two ports on the unit (one on top of the other)
- Connect the ‘CD In L’ and ‘CD In R’ cables (they’re labeled) into the second and third ports of the center row
- Plug in the other two connections in the middle and bottom right of the unit
Your connections should look similar to mine unless you have a subwoofer – you’ll have something plugged into one of the other ports according to the diagram on top of the back of the unit.
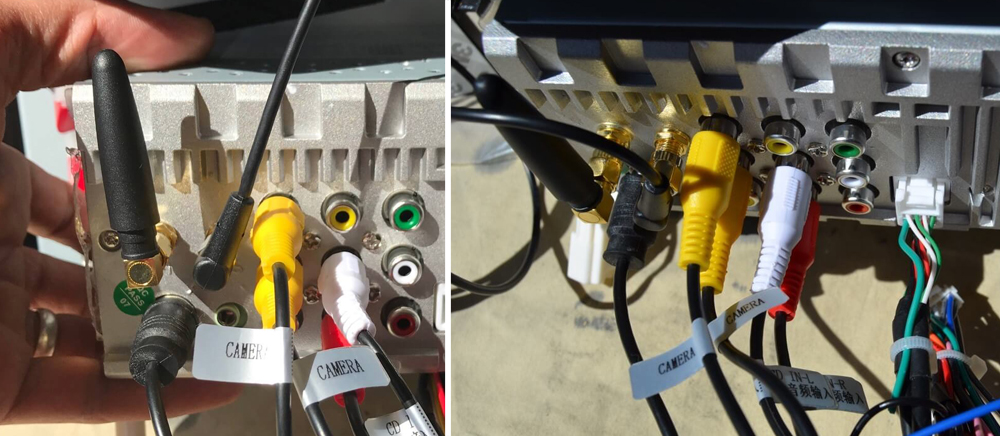
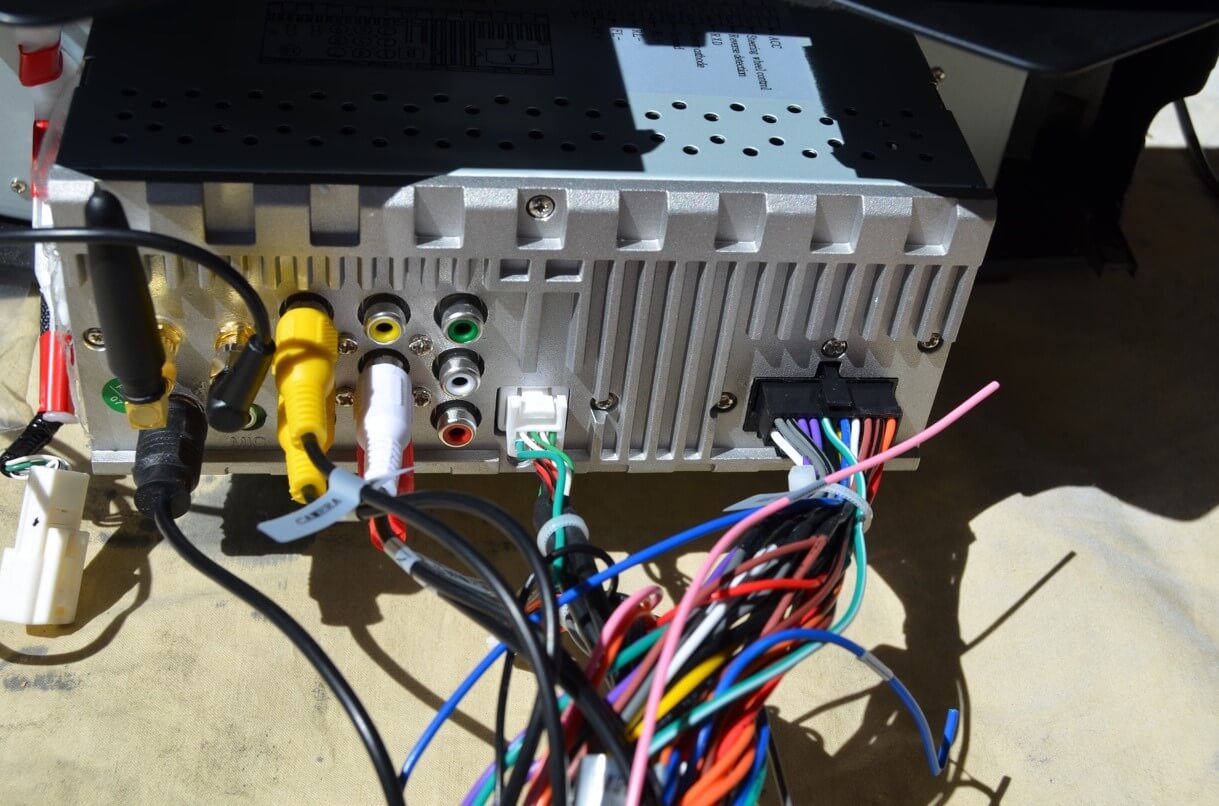
As you can see from the pictures, I didn’t have anything plugged into the 3rd / last row of the unit.
You’ll know you are done with all the connections when nothing from the new unit remains to be connected.
STEP 5: CONNECT OEM CABLES TO THE BACK OF THE NEW UNIT
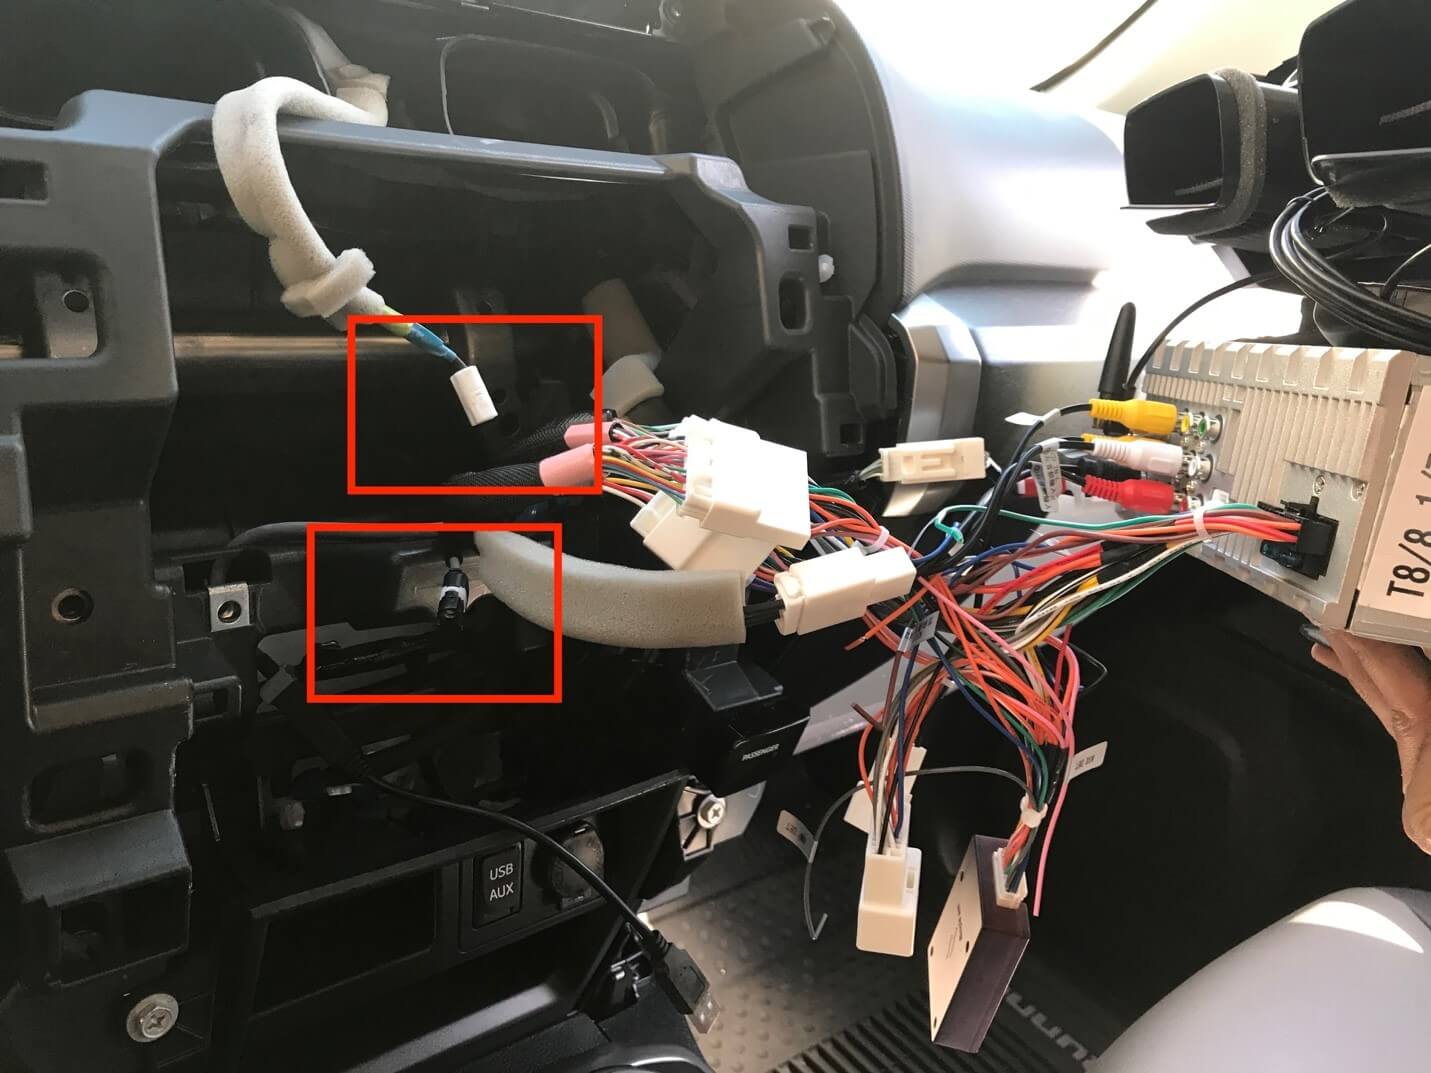
We’re ready to connect the OEM cables to the new unit. As I mentioned previously, the good news is no two connections are the same size, so it really is just a matter of connecting two similar pieces until you hear them snap. You should not have to use any force during this step.
I was worried because I had two OEM connections that didn’t have a home. One was for the factory GPS, the insulated cable that runs down from the top of the center console. The other was for XM radio, which the new unit does not support.
STEP 6: VALIDATE YOUR CONNECTIONS THEN TUCK WIRES BACK AND REASSEMBLE THE CENTER CONSOLE
Once everything is plugged in, gently tuck all the wiring back into the dashboard, but do not snap the new unit into place yet. I recommend turning on the 4R and ensuring everything powers up as it should. I validated the following:
- Unit has power and turns on.
- The radio works and I can listen to local stations.
- WiFi works, if available where you’re doing the install.
- The backup camera works when I shift into R.
Once everything looked good, I turned the 4R off then snapped the Android unit into its new home.
Reinstall the appropriate trim pieces starting with the A/C control unit – don’t forget to connect power to the back of the unit.
Once it snaps into place, install the left and right trim pieces.
That’s all she wrote!
FINAL
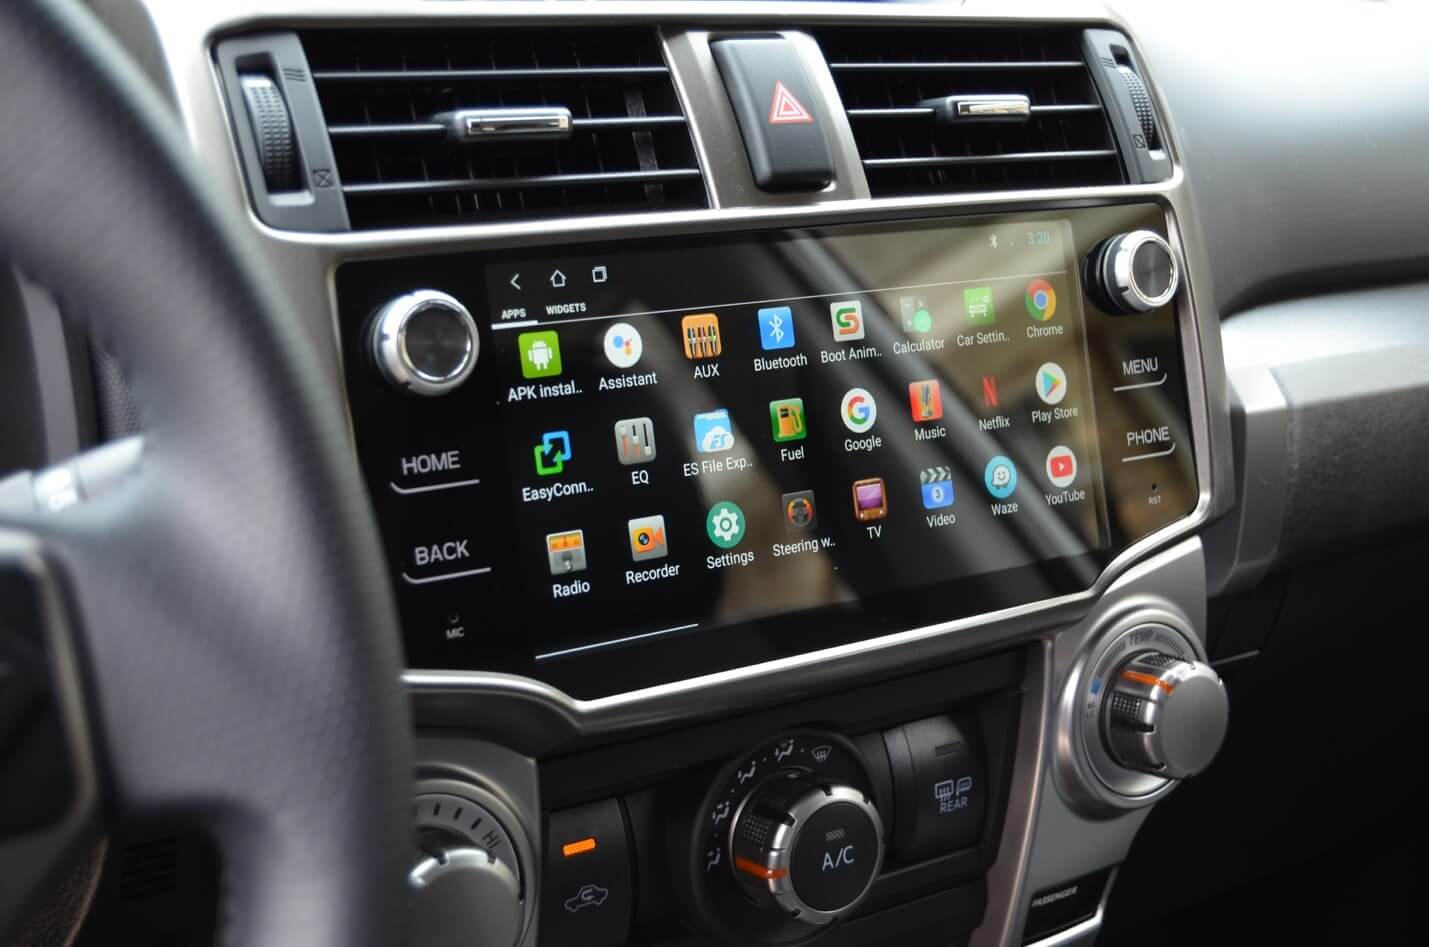
Now, you can access the Google Play store and download all the apps your heart desires.
Please remember that although this unit allows for a lot more flexibility than Entune, that you should still exercise caution when driving.
Just because you can watch YouTube or other videos doesn’t mean you should. #endPSA

its garbage if you have an IPhone.
Is there gps on it
Would this unit fit a 2012 with the standard audio in dash? I do not have a multimedia head unit.
same procedure/fit for the 2019 SR5 (not premium)?
yes
Do you get full functionality from the steering wheel controls? Also, are there plans for a version of this head unit with a CD player? Also, what is the name (or web link) for the company that makes these?
Will the T9 work and fit in mine, I have a 2010 4R SR5 basic stereo with back up cam in rear view mirror?
Did you ever pick one up. I have the same year and model and I was curious if it worked
Where can this be purchased from?
Directly from CarTrim.
Is there any chance this would fit in the 2010-2013 models? I know it says 2014+ but it seems like it’s the same size piece.
I have a 2010, it fits perfectly, BUT, much of the connectors don’t fit, you get the radio, no amplifier, no rear speakers, and no steering wheel controls
Hmm… any luck finding different connectors or options to hook it all up? Seems like it’s probably just a wiring issue. I doubt the functionality is any different from one year to the next.
My unit came with a cracked screen, well packaged from China also. That begs the question: IF the glass can’t survive the shipment, how does it survive offroading or children in the long run? I was very disappointed that I initiated a return and having to go back to the stock Entune system 🙁
Sounds like an unfortunate incident, Clyde. I can tell you that I’ve wheeled and trailed plenty of times without any issues at all. My screen has also not had any issues taking repeated blows to it from my 5 year olds fingers when he navigates his YouTube app. Maybe your screen was cracked before it was packaged?
Wait, so is there a way to take the old gps system and replace it into the new one. The new gps system provided with the t8 head unit is extremely slow and the old 4runner headunit gps was not bad at all. Everytime i try loading an offline gps in the system, it either freezes or is extremely slow.
I don’t think you can swap the factory GPS into the new unit. What app are you using for GPS with the T8 – Waze, Google Maps? Are you trying to run multiple apps at the same time when using GPS? I would be sure you don’t have automatic app updates turned on with the T8 or it can try to update apps when you don’t want it to and bog down the unit. I don’t recall where that setting was, maybe within the Google Play store, but it’s definitely worth checking to confirm its turned off.
Does anyone have insight to hooking up the front facing camera with this unit. I ordered the option since it was so inexpensive. I was going to tackle the install this weekend but have not seen anyone discussing it.
Got mine in today. The radio harness has 7 big white connectors that must be plugged in to the 4Runner harness. My 4Runner has 5 big white connectors. There are no connectors on my 4Runner to plug the extra 2 radio harness connectors to the 4Runner harness. None of the 4Runner connectors will fit the extra two radio connectors. One of the extra connectors has several wires including the RCA reverse camera on it. The other extra connector is marked “4Runner” on a label with a bunch of Chinese characters.
Have any insight on this? What am I missing?
I believe there are 2 connections from the factory unit that will not be plugged into the T8 – one is for the factory GPS and the other is for XM radio.
Support sucks!
What makes you say that? What issue are you having? Have you contacted them via email? Did you check your junk folder? I usually get a response back within 48 hours.
My screen is upside down and I can’t put it as it should be please help
I would contact CarTrim via the website or email and ask them for assistance. I don’t see any options in the menu on how to fix that or change it.
any know what those two unused connections are for on the new units harness?
Man I can’t believe it everything is working so far even the aux!
So, any suggestions on mating this thing to an OEM 2010 p-1850 radio. Only one of the T8 Harness plugs match the toyota harness. Is there another harness for the T8?; or where can I get a wiring diagram for the OEM radio so I can start splicing?
I thought the T8 only worked with latter 5th gens
Is there an easy way to accommodate a second (front facing) camera with this unit?
Yes, definitely. CarTrim also sells a front facing camera for relatively cheap.
Yes a second camera can be added in the composite Yellow RCA plug separate from the back up camera.
Will this headunit work with an amp and after market speakers? I’ve read that people have been saying the sound quality is worse than the oem unit
I’m installing right now and though can’t give you a definitive answer (like “yeah I installed it and it works”) it does have Right channel, Left channel, and sub outs plus “Amp Ctrl” and “Amp Det” splice ins.
Atul – Thank you very much for posting this information and I have a few questions!
1.) How is the sound quality compared to the stock Entune system?
2.) I have an Android phone and wanted to know if this will work wirelessly without connecting to my phone with a hard-wired adapter? And, if I decide to use Android Auto for whatever reason? Basically, do I need a hard-wired adapter as I am trying to stay away from having to plug in and unplug my phone every time I get in an out of the vehicle? I do know the a adapter is required for iPhone and Carplay, but was hoping this was not the case for Android.
3.) I know you have pictures of the back of the unit, but was wondering if this would work with the “OEM AUDIO PLUS” plus system that Frank just reviewed on March 16, 2018?
Any thoughts were be greatly appreciated!
Hey Scott,
1) Unless you’re an audio hound, the sound quality is comparable to OEM. I noticed a small difference, but my passengers have not. You can customize settings using Equalizer application with ease.
2) If you’re using Android, I’m 99.25% certain it will be wireless. Only us iPhone guys have to plug-in to the CarPlay adapter.
3) I don’t have OEM Audio Plus but someone else I helped out with purchasing the unit reached out to them directly and they said they would make it work if you shipped them the unit. To be on the safe side, I would contact them and confirm what that process would look like. I don’t want to steer you in the wrong direction.
Thank you very much for you honest feedback and will certainly reach out to OEM Audio Plus regarding integration with their setup!!
I know this says 5th gen – but i have a 2010 limited with the JBL audio. However, it looks slightly different than the 2014+. Do you know if this will also work for the 10-13 folks?
I just installed it on my 2010 4Runner Limited(CDM) by myself. It has JBL audio. Right off the bat, everything works except OEM rear camera, steering wheel functions, aux port. Bluetooth works(poor quality IMO), radio works, this unit has better sound drivers than OEM so it sounds better but has too much background white noise for my taste. Im gonna take it to a professional to make everything work.
For me, the main most important things were, bluetooth, google maps and radio and backup camera 3/4 already work. So its worth it for me.
P.S. I’d recommend cutting the middlemen and buyt straight from aliexpress,(I paid 480$CAD which is ~360USD)
Any luck on figuring out how to get these other functions working? I have a 2011 and would like to do this upgrade as well.
Good to know. How was the support from aliexpress? Did you reach out to anyone over there? How was the sellers’ communication?
Aliexpress overall is meh, but products are cheap and worth taking the risk for. Just make sure to purchase with only with Credit cards in case they try to pull a scam or a bs on you so you just contact your bank and get reimbursement.
I didn’t have any need to reach out to anyone over at AE since product I received worked as expected. (I knew what wasn’t gonna work before I made the purchase).
The head unit arrived in 20 days to Canada, Montréal.
Got it, I would suggest PayPal over CC with AliExpress and really any company overseas. PayPal is quick to give you your money back. Usually faster than a bank/CC IMO.
I don’t think it would. To be sure, I’d recommend reaching out to CarTrim directly to confirm.
Where did you end up mounting the external mic if you used it? I ordered my unit this week, and I’m debating on where to put it. I like a clean install that looks OEM. I imagine the cable length is the determining factor in where it can go. Install looks good!
Hey Chris, I didn’t end up using an external mic, but if the length allows for it, I would personally place it at the top of the head unit, near where the clock resides on the 5th gen. That’s where I currently have the GPS device sitting. There is enough room to slip the wire through the top without it being an eyesore.
This is great and I can’t wait for your post install review! My questions (yes, some are as obvious as they seem).
1. This will integrate and use the backup cam by simply plugging in?
2. This eliminates the CD player? (No, I don’t use it just being sure I understand.)
3. Does the ODBC tool add on require a monthly service to then use? I’ve seen that most appear to need some sort of service to have any value.
4. I see where you said the inputs list was given, but between the car-play adapter and the truck’s current auxiliary input, can they play together? I mainly would want to be able to use the existing plugs on the dash and not have a new set of wires hanging out somewhere in order to leverage them.
Hey ChrisB. I submitted a one week follow up to Brenan yesterday that has a number of these questions answered, but I’ve answered again below.
1. Yes, the OEM camera will be plug and play.
2. This does not allow for CDs.
3. I think once you have the ODBII reader, you can download an app from Google Play to view the data. There may be some free versions, but I would expect something common like ‘Torque’ to have a fee.
4. Are you asking if the existing AUX/USB down towards the bottom of the center console still work with the new unit? Honestly, I haven’t tried that. I live off my iPhone and Bluetooth and haven’t ever used the OEM plugs. I’ll give it a shot later today or this weekend and follow back up.
Thanks Atul. I would most likely blue tooth it myself, but if CarPlay requires a connection, I want to be sure that three are no new/additional cables hanging somewhere. Will keep an eye out for your review.
So I freaking love this headunit. It’s the best looking one I’ve seen ever for 4runners.
The only negative is the RAM, 2GB is, in my opinion, not enough to run the apps on here. 4GB is standard today, but my guess that this unit is older and therefore the processor is older as well too.
I would really really love a review of this unit on YouTube. That would be another deciding factor for me.
I’m working on a written review for the site and hope to have something by tomorrow or Thursday. I did post a few clips of the new unit in action on my IG if you want to see how it looks. @that_white5thgen4r
Has anyone did any serious research/digging into firmware/software? Secure? No surprises? Just don’t use billing info or logins?
It’s funny you ask that. I haven’t done any deep digging into the unit (I’m an Apple fanatic vs Android) and don’t plan to. I’m just playing it safe and not logging into anything sensitive (home alarm system, smart home apps, etc).
Did you swap the brackets from the side of the factory HU before install for OEM mounting or just snap it in as is after connections? I’m installing on a 2019 TRD Off Road and seeing only small differences (Had to swap over the vent control labels via 2 #00 phillips; looks like my vent clips were a little different but still fit fine; hazard switch is a little sticky since fit isn’t very tight but seems operable and given how little I use them not a concern. I may be pausing my install for a bit though to see if I can splice in the factory GPS and Mic since kinda silly to have both….btw if anyone is knowledgeable on whether I can just cut the factory GPS line and splice in the after market connecter please let me know. Looks like just a standard *coax but since I can’t disassemble/unpin the aftermarket like I can the factory I’m a little wary. Plus just glancing AM Mic is 2pole 8.5mm which don’t see anything clear on OEM wiring
nvm re: brackets….they don’t fit
Correct, sorry for the delay. The brackets from the side of the OEM unit do not need to be installed with the new unit. The only thing you need to transfer over are the two vents and hazard light switch. I didn’t tackle any splicing to use the OEM mic/GPS – it was much easier to just use the new GPS, personally. I know some folks just used the 3M tape to secure the GPS to the top of the unit (behind the dash) so it’s functional but out of view. I just opted to secure it near the clock – it’s not an eyesore for me.
Yeah, I figured out the OEM GPS just sits on a little tray behind the clock under the dash. I just used a flat head to lift off the clips and a hook pic to pull it out and swap the antennas. I did also have to move a couple other little bits like the Open/Close vent indicators next to the vent wheels and the tray on the top with a few #00 phillips….now I just need to figure out why my backup camera isn’t working.
I got pictures of the GPS tray if you want.
This head unit is pretty awesome though. Going to be spending waay too much time customizing but I do that with my phones too. Thanks for this writeup and getting me started on this. Entune was the only thing that bothered me about this vehicle. Too used to a bypassed brake switch on my last truck
Could you send the pictures of the GPS antenna swap? Will probably do the same on mine…
So not sure how to add pics…maybe Brennan or Atul can pull these and put somewhere better…and I’m not just giving access to my whole drive. Try this: https://drive.google.com/drive/folders/1cTY0fcK6WO_UKkbR_vu–INhUQGt4epX?usp=sharing
Thanks, David! Looks rather straightforward. Let us know if the 3m tape holds up after the summer…
We are in the process of adding a media upload within comments. Should have it done this week or next.
Does the head unit have an auxiliary in that that you could hard wire an external XM receiver? Thanks
If you visit the manufacturer site and scroll to the 3rd to last pic, you can see all the available inputs.
Great write up. Been keeping an eye out on feedback for this unit. Very interested.
Looks fantastic! Since you can access the Play store, couldn’t you DL the XM app and stream music thru it?
I was told that this was an option but since I use Pandora (free version) instead of XM, I cannot validate the functionality without being able to login to XM once the app is downloaded.
This is great! Hopefully we will see soon other companies releasing new models.
I wish there was an option to have black dashboard instead of silver though.
Glad you like it. The company does have a black version. It is not shiny like the interior from the TRD Pro – it’s matte black.
I agree though. Maybe this will push more companies to release equally competitive solutions for the 4R community.
You are right! I missed that, thanks.
Also, in the options I see a ‘driving recorder’. Do you know what it is for?
And did you try to use CarPlay as well?
Thanks
I believe the car recorder is just a camera the manufacturer introduced, but I don’t have it nor did I buy the CarPlay dongle. I’m just using my phone via BT and use it as a hotspot for the unit when I need data.
I’m working on a post one week install review of the unit where I’ll talk about what I’ve learned since installing it. Stay tuned.