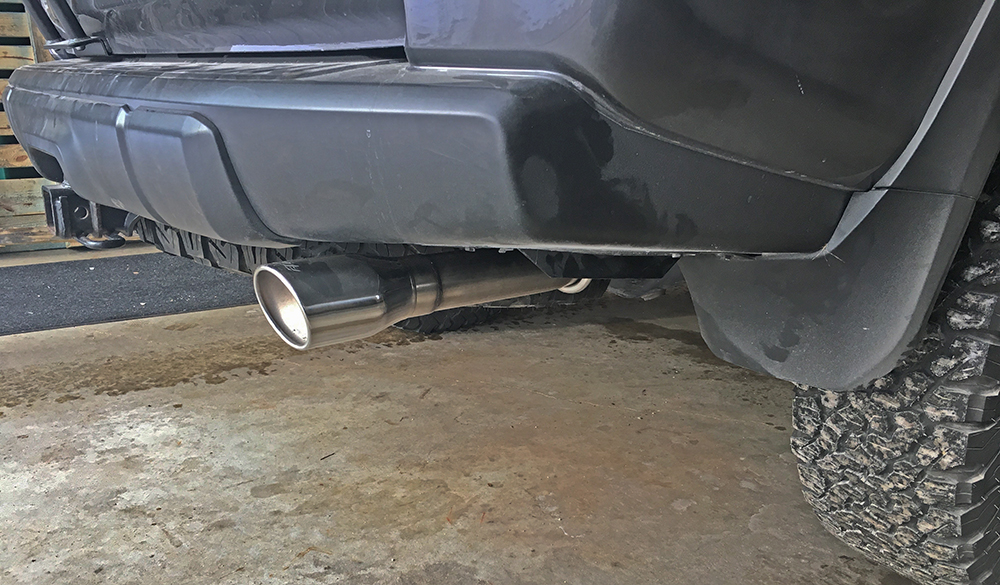
The decision to install a cat-back exhaust system on my 2013 4Runner Trail was tough. By 2017, the 5th gen 4Runners lacked significant performance upgrades to boost the stock 270hp and 278lb-ft of torque, especially for towing or off-road mods. There’s no supercharger option yet, although one is in the works by Magnuson.
While performance electronics like Sprint boosters and URD’s products offer perceived power increases, the true gains are questionable. Headers are difficult to install and may cause emissions issues. Cold Air Intakes show slight gains (around 10hp), as do cat-back exhausts.
After much research, I chose the Borla cat-back exhaust, which provides a growl without annoying drone at highway speeds. It’s a solid, all-around option for the 5th gen 4Runner, and I’m happy with the purchase.
Find It Online:
Table Of Contents
Installation Overview

Disclaimer
- You accept the responsibility of your Borla Performance Cat-Back Exhaust System install. I and Trail4Runner.com are not responsible, nor liable for any injuries or mistakes. Make sure you have read the formal documentation that comes with the Borla Performance Cat-Back Exhaust System and agree with the terms.
Skill Level
- Low to moderate (can be done by a handy do-it-yourself type)
Total Installation Time
- 1.5-2 Hours
Tools Needed for Installation
- 3/8” Drive Ratchet or impact driver
- 3/8” Drive Extension, 3 inches
- Torque wrench
- 15mm socket
- Pry Bar
- Sawzall with metal blade (Just in case)
- Hand protection (shop gloves)
- Eyewear (protect the eyes, debris will fall during this)
- Rust penetrant
- WD40
Check your parts
Unpack your new Borla Cat-Back Exhaust System and check the parts. If something is missing, don’t take your old exhaust off. Often you will need to cut bolts or piping to remove the original system, so once you start, you are committed. Make sure you have all parts to install your Borla Cat-Back Exhaust System!
There are only three:
- Muffler assembly
- Tail pipe assembly
- Accuseal Clamp
Table Of Contents
1. Remove Original Exhaust
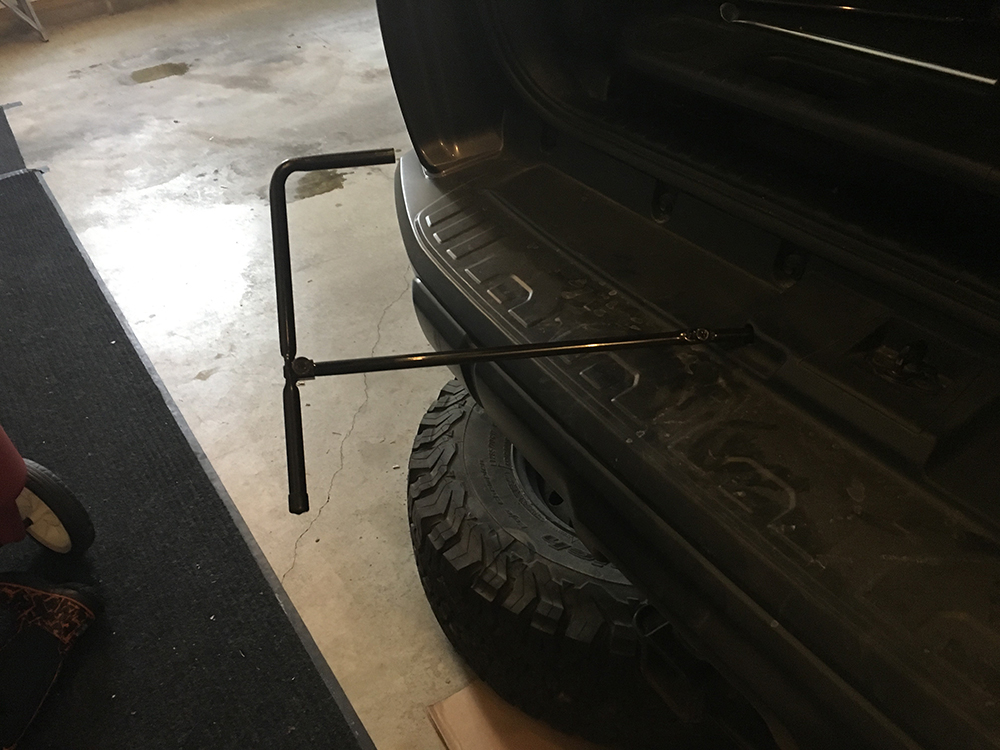
Remove the spare tire before you start to have better access to the exhaust system. Consult the manual that comes with our vehicle for removal of your spare tire. After struggling with it in place for a bit I took the time to drop the spare and that made a world of difference.
I lubricated all of the hangers and rubber isolators with WD40 with the expectation that I would need to slide off the original tailpipe and muffler assembly. As you can see in the image below, my old system, despite low mileage, was quite corroded from the Minnesota winter salting.
Pro Tip – Spray all bolts with rust penetrant to facilitate loosening.
2. Unbolt the Tailpipe from the Muffler
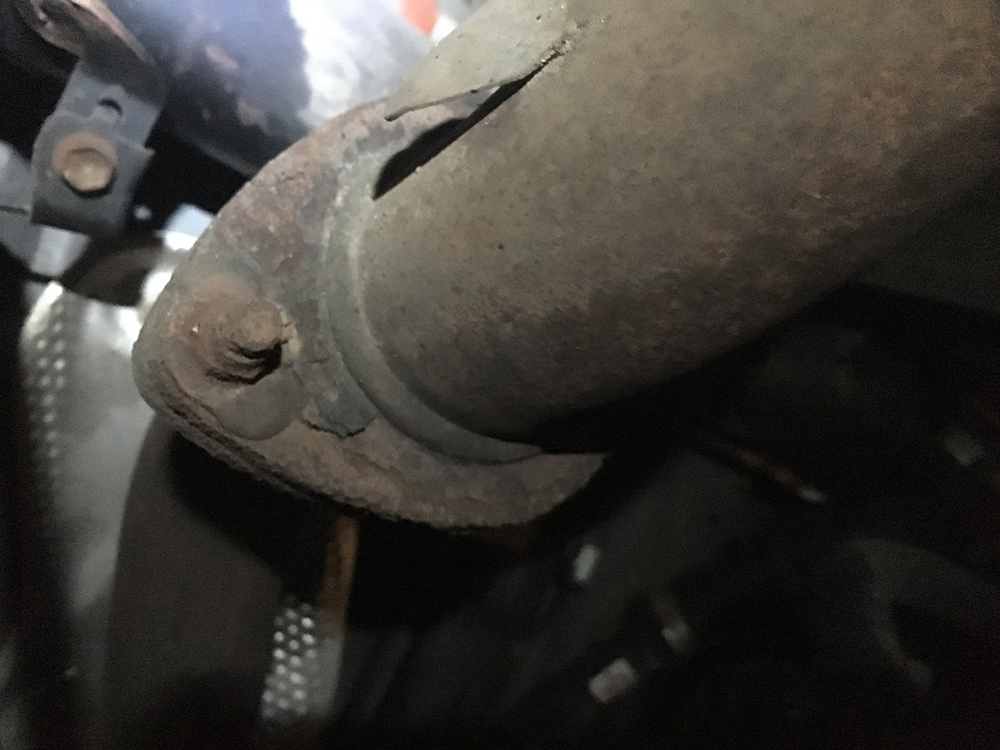
Now, the instructions from Borla tell you to “unbolt the two bolts on the front flange behind the rear axel.” If you can do that, great. Use the 15mm socket and get it done. Unfortunately, real life kicked in for me and this is what those bolts looked like with Midwest corrosion.
3. Cut the Tailpipe free if Corrosion

I think it was a combination of spot welding and rust. Nevertheless, the socket did not seat and the bolt dissolved when I applied pressure. At that point in time, I used a 20volt Dewalt cordless sawzall to cut the exhaust piping behind the muffler and in front of the flange by the rear axel.
I then removed the rear tailpipe from the hangers and removed the rear tailpipe. This is a pretty simple process. Once everything is unbolted, just pull off the tailpipe parts out. This is where removing the spare tire comes in handy. If you do not remove the spare tire, it will be very tight when trying to remove the OEM tailpipe.
4. Unbolt and remove Muffler Assembly

My buddy held the original muffler into position to avoid it plummeting to the floor as I began the process of removal. I removed these two bolts in front of the muffler (they attach to the piping for the catalytic converter, etc.) and then backed the muffler assembly out of the hangers to remove it. If you do not have a second hand or a freind with you, you can always use a lift jack to keep your OEM exhaust system in place.
Pro Tip – These bolts were barely in the condition to be removed after a fair amount of penetrant. I would suggest getting a replacement pair just in case you need to cut them also.
5. Install Borla Exhaust Muffler Assembly

Installing New Borla Performance Cat-Back Exhaust System
Install the new Borla Performance Cat-Back Exhaust System assembly by placing the hangers through the rubber isolators. The same bolts you removed earlier (above) can be placed back in to bolt the new muffler on.
6. Install Borla Tailpipe
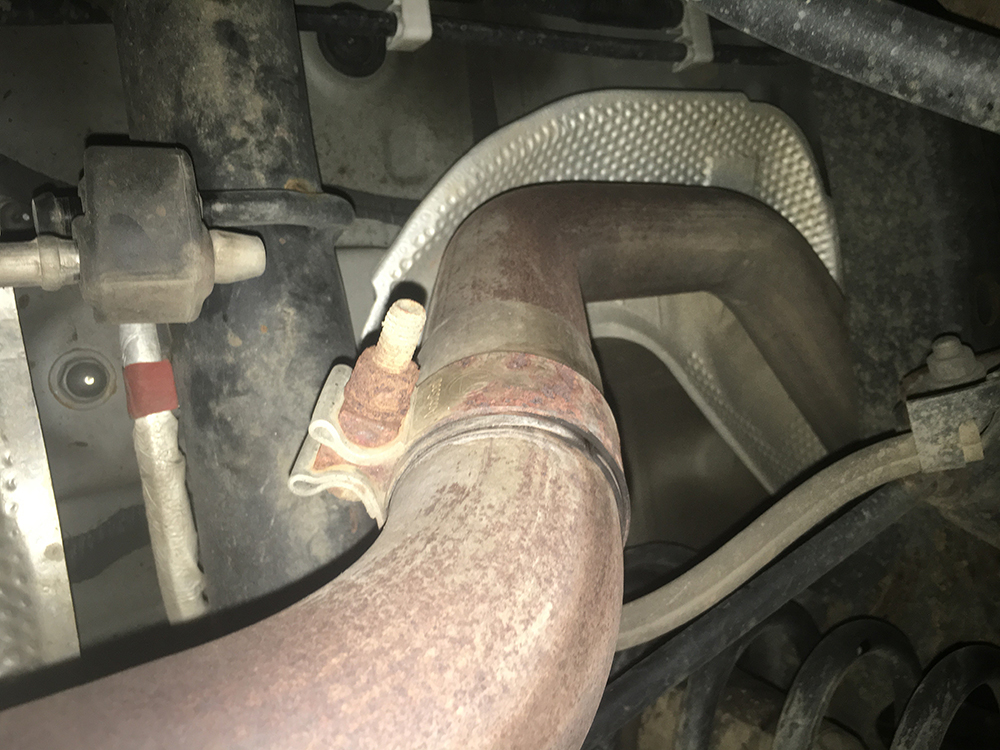
Sliding the clamp over the tail pipe assembly, arc the tailpipe over the rear axle, slide onto the muffler, slide the tailpipe hangers into place on the rubber isolators, then tighten the clamp. Sorry for the image above, this is a picture from several months after the exhaust install.
7. Tighten Accuseal Clamp
After checking the position and clearance of the system use a torque wrench to tighten to 33-35 ft.lb. of torque. The Borla Performance Cat-Back Exhaust System comes with a set of instructions that will tell you the exact torque. If you do not have a torque wrench, go buy one. You can find them for around $40-$100, you will use it again in the future if you are working on your 5th Gen 4Runner. You need a torque wrench for literally everything.
Check for exhaust system leaks or strange sounds after starting the vehicle. Note these mentally and turn off the car. Wait for things to cool down before making adjustments to your new Borla Performance Cat-Back Exhaust System in order to avoid injury.
8. Enjoy your new sound
Pro Tip 1 – Heat shield for the spare tire
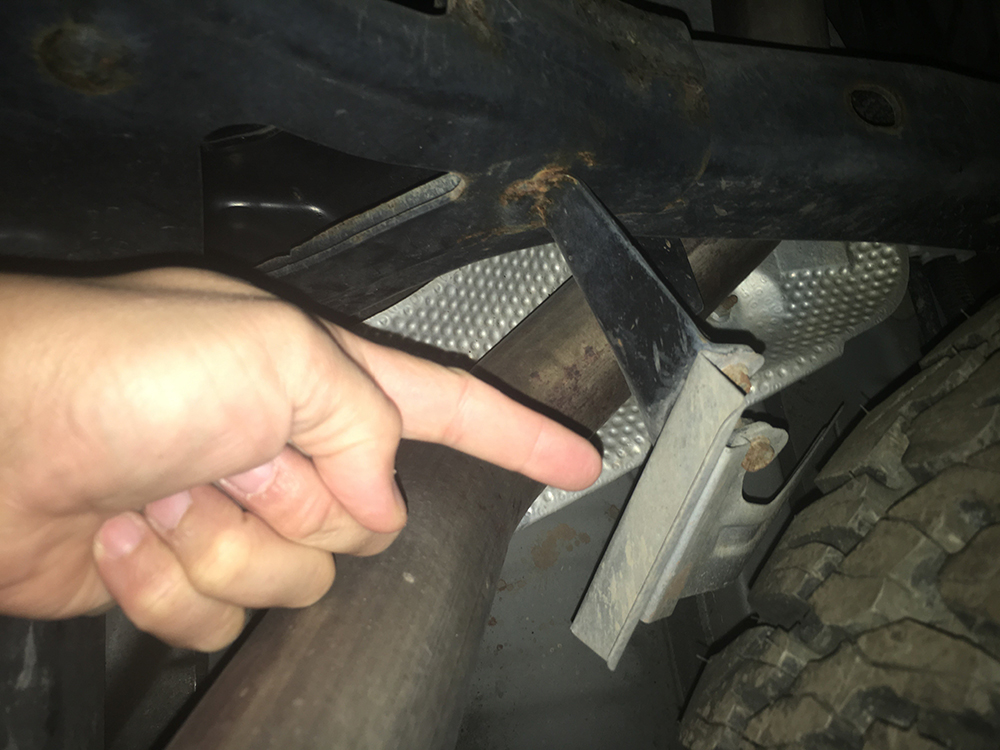
I began to notice, at the end of my 15-minute drive home from work. Intense rattling. After inspecting the vehicle I realized that as the tailpipe arcs over the rear axle, it comes in close proximity to the heat shield for the spare tire. While this has plenty of clearance at rest, the tailpipe does expand with heat, and thus was coming within the vibratory distance of the heat shield. I simply bent the heat shield away and that completely solved the problem.
Pro Tip 2 – Close proximity of the tailpipe to the bumper
While it was not a problem for my 2013 Trail, many people have commented on the close proximity of the tailpipe to the bumper on SR5 and Limited 5th Generation 4Runners. This may require hanger adjustment or trimming, though the consensus is that it is an easy fix.
Decide for yourself
Ultimately the type of exhaust you want is a combination of performance and sound. This fit my needs/wants, spot on. I remember thinking many times “If I could only HEAR IT on my rig.” As such, I recorded the stock exhaust at startup, then at 2/3/4K rpms, then acceleration to cruise at 50mph in the cab, then uphill in the cab.
Feel free to check it out on youtube:

I just installed the Borla S-Type Cat-Back Exhaust Systems (p/n 140760) on my 2013 Trail edition 4Runner. It fit great no rattling on heat shields. No drone on the highway and it’s slightly louder than the stock one at idle. This one S-Type model has no exhaust tip, just a angled cut pipe look like the stock one.
The only thing I’m disappointed in, there was no donut gasket. I had to reuse the old one until I could get a new one. I have had plenty of exhaust systems on my cars and truck over the years and they always come with all the gaskets. This is the first Borla bolt on that I have purchased. I have a Borla muffler welded on to my CJ7.
What site did you order the S-Type? Only one I can find for my 11 trail edition is the Touring.
Brenan, I just installed the TRD CAI on my 2019 TRD Pro. Regarding aftermarket exhausts, if we assume performance is the same for all brands, my preference is minimal noise similar to the factory exhaust. Not interested in drawing attention to myself or my truck. Borla is the most quiet, correct?
I called Borla and unfortunately the quieter Borla Touring #140379 does not fit TRD Pro, only the throaty Borla S-Type #140760. CariD.com says #140379 will not fit the TRD Pro however 4WP.com website says #140379 will fit the TRD Pro. 5th Gen 4Runners are all essentially the same vehicle, no? My issue is I want to black powder coat the #140379 prior to installing it but if this exhaust does not fit the TRD Pro, I cannot return it due to powder coating. Your thoughts?
Though this reply is 3 years late, I will offer what I know as of today on my 2011 limited 4runner. . I just installed the Borla cat back #140379.
First order a new exhaust seal for the flange, why risk an exhaust leak. I read many threads where folks where having issues with tail pipe clearance. Borla website states this p/n will not fit various 4runner trim levels. The only trim level Borla didn’t list as not fitting is the limited trim.
The install is straight forward and yes, follow the recommendation to remove spare tire. The tail pipe fit perfect on my limited 4runner. What I noticed is that the limited bumper cover has a notch where tail pipe fits. Other trim levels don’t have this notch. Tail pipe is perfectly centered side to side and up/down. I looks great and OEM. Also, the kit I installed had a manufacture date of May/2022.
Performance is great. Slightly louder than stock when accelerating, just as quiet as stock when traveling along on highway and very important here… zero drone at any rpm. I recommend this Borla product.
Which Borla muffler comes in this kit?
Borla’s website says their exhaust won’t fit a 5th Gen TRD Pro. I emailed them to confirm and they replied that it won’t fit my 2018 TRD Pro. Any idea why it wouldn’t fit? Borla didn’t elaborate.
Hangar needs to be longer. Muffler shop can cut the hangar and weld another on easily.
Good to know. Thanks, Tim. You may want to give some muffler shops a call and dig around. See whats going on.
Sounds better. I love 4 runners period but really like some decent sound and performance. Wish there was more you could do but it really takes a V-8 to get GOOD sound and performance.WISH they would bring back the 4.7 or larger V-8. Would go immediately to get 1.
Love this Site, Thanks to you I have added, Borla, and. TRD Air intake, holding at 17.1 mpg in hilly Western PA, smooth on the highway to 80, worth the money, also added the Rago Fabrication to the back side windows..
best informative site out there..
Guy, THANK YOU! Really appreciate it.
Wendell,
I agree it sounds better than stock, by far. I like the sound of the MagnaFlow a little more than the Borla but my girl likes the more mellow sound of the Borla. Either way, they are both much better than stock. And yes, please listen TOYOTA… bring a 5.0 V8 to the 4Runner! How amazing would that be?